How UpSeller Users Can Integrate with OMS to Achieve the Complete Drop-shipping Workflow
I. Definition
This document outlines the complete workflow for Latin American local sellers to authorize stores, process orders, and push products using UpSeller.
II. Operational Procedure
Step 1: Authorize Store
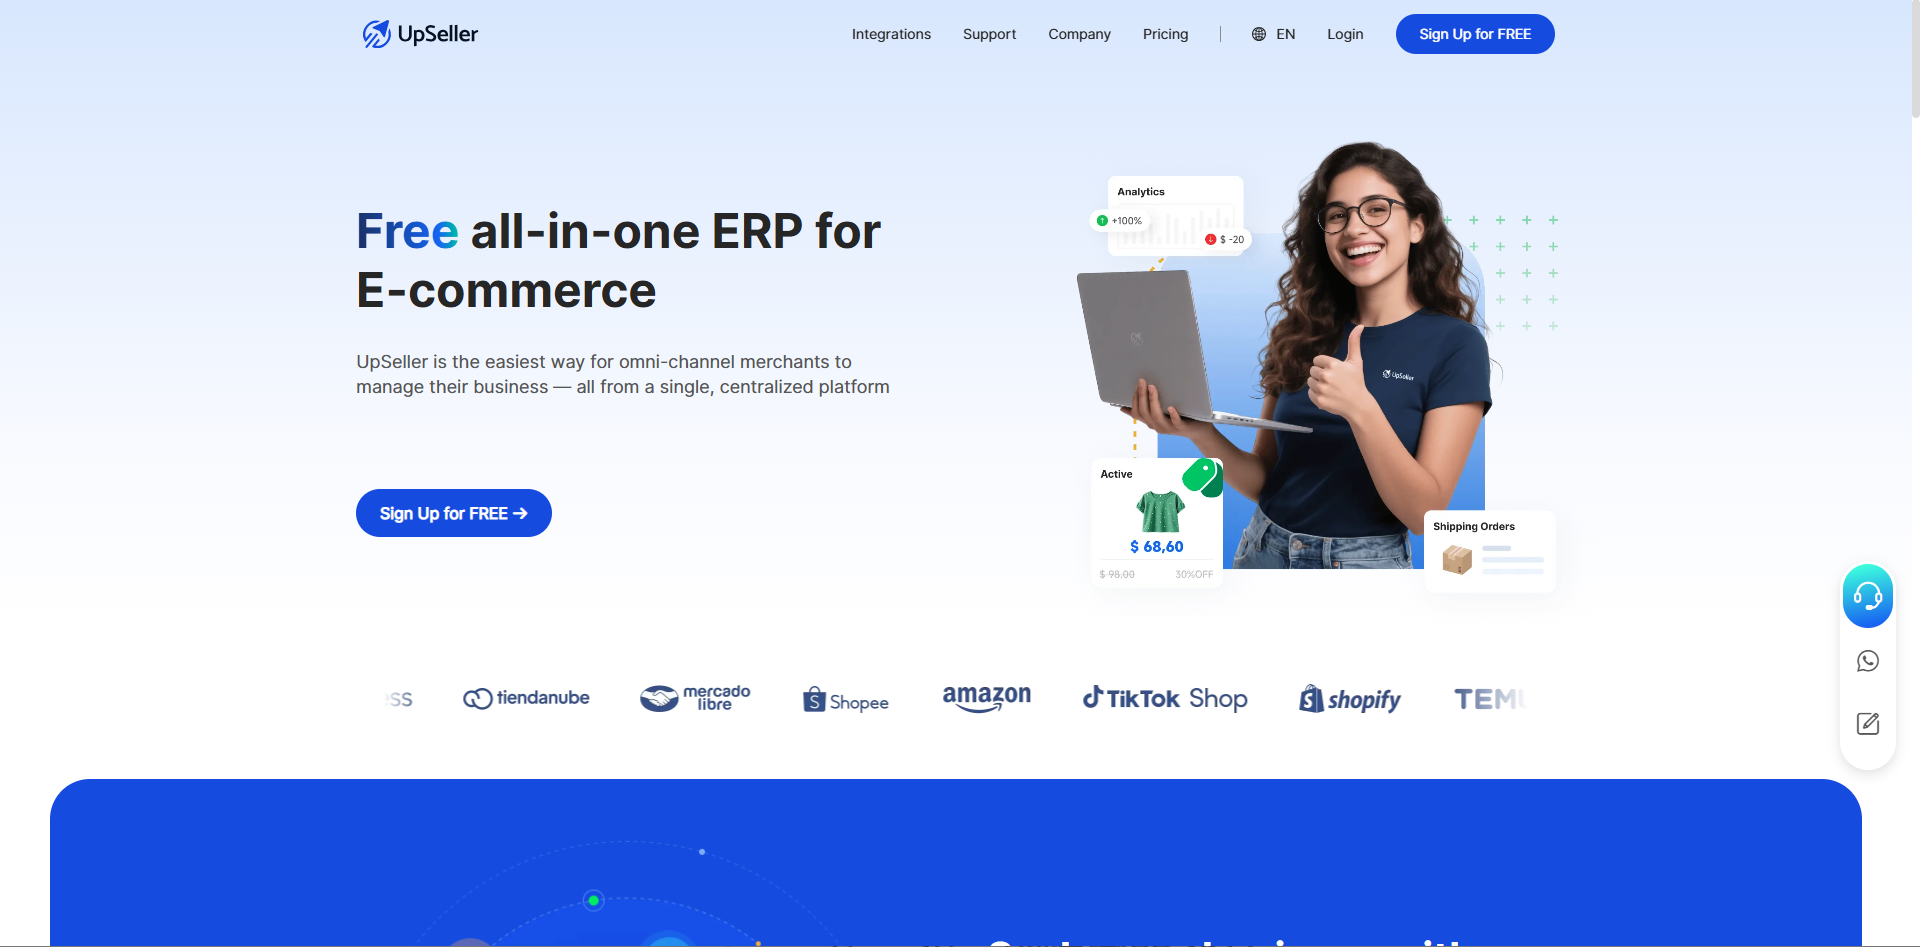
Step 1: Log in to UpSeller (It is recommended to open UpSeller using the latest version of Chrome, Firefox, or Edge browsers).
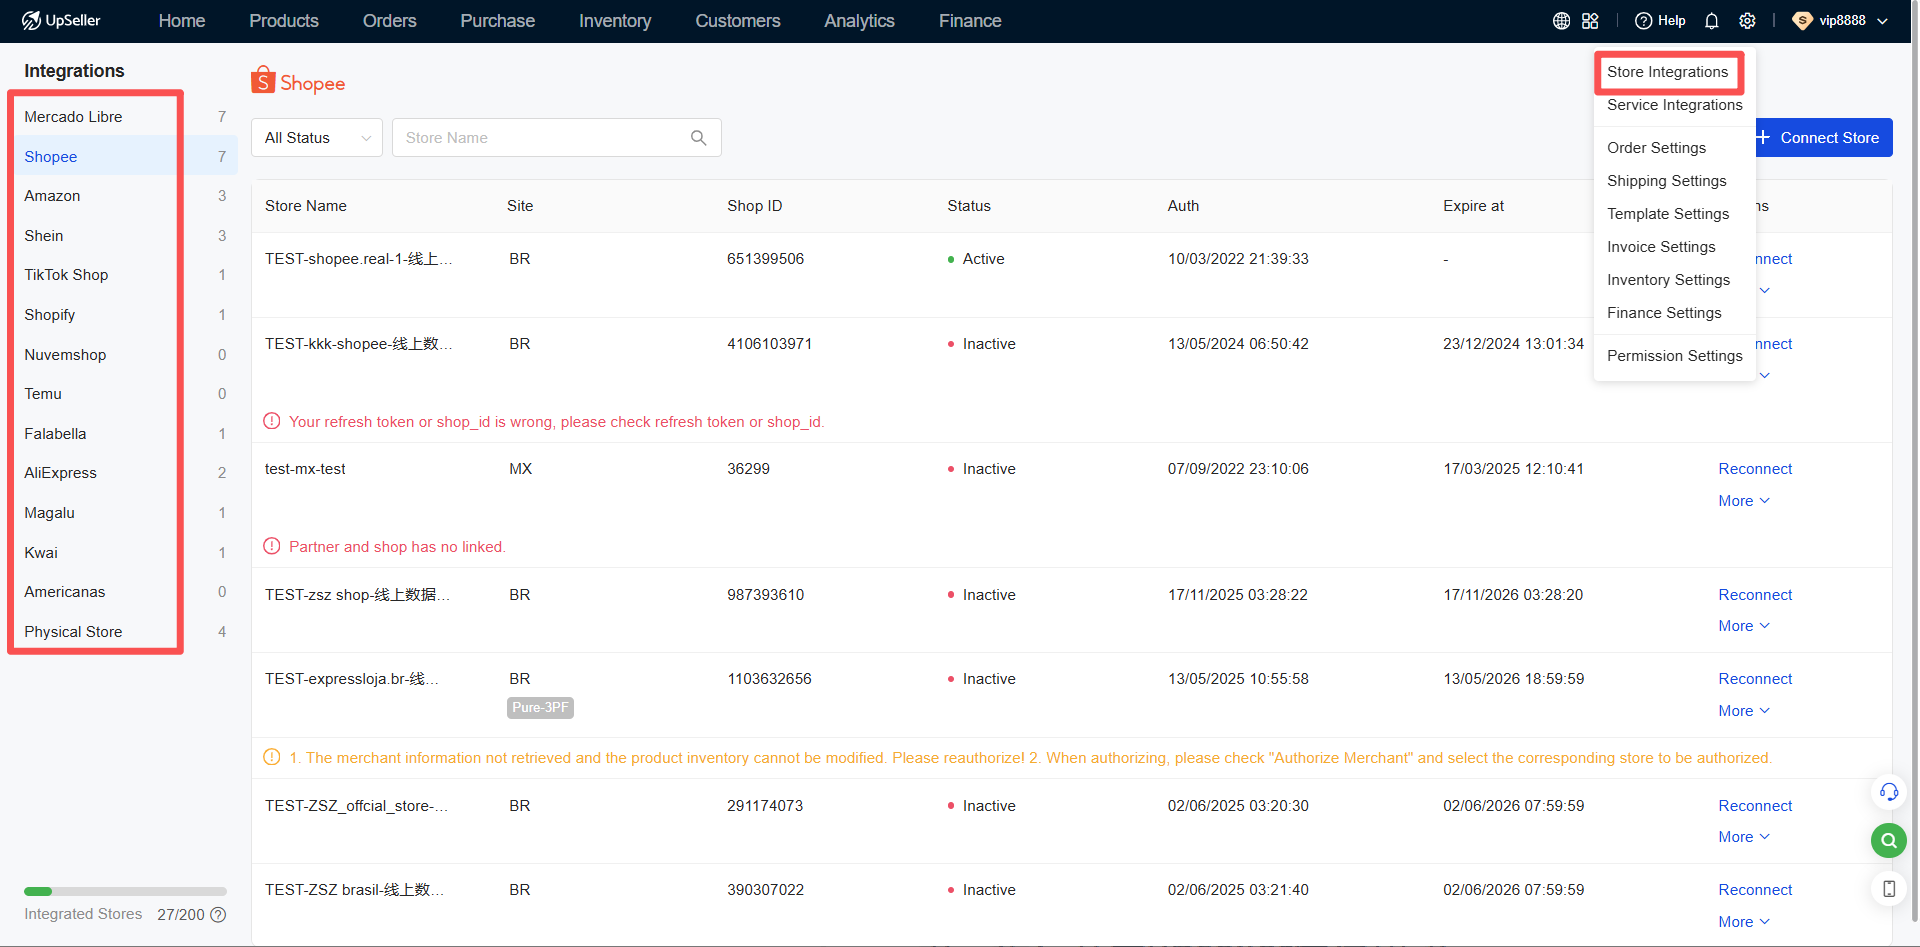
Step 2: Select the Platform for Store Authorization
(Shopee / Mercado Libre / B2W / Shein / Falabella / Magalu / AliExpress)
Step 3: Enter Store Nickname
Note: The store nickname is used only within UpSeller. It does not need to match your actual store name and is intended for easier identification and management.
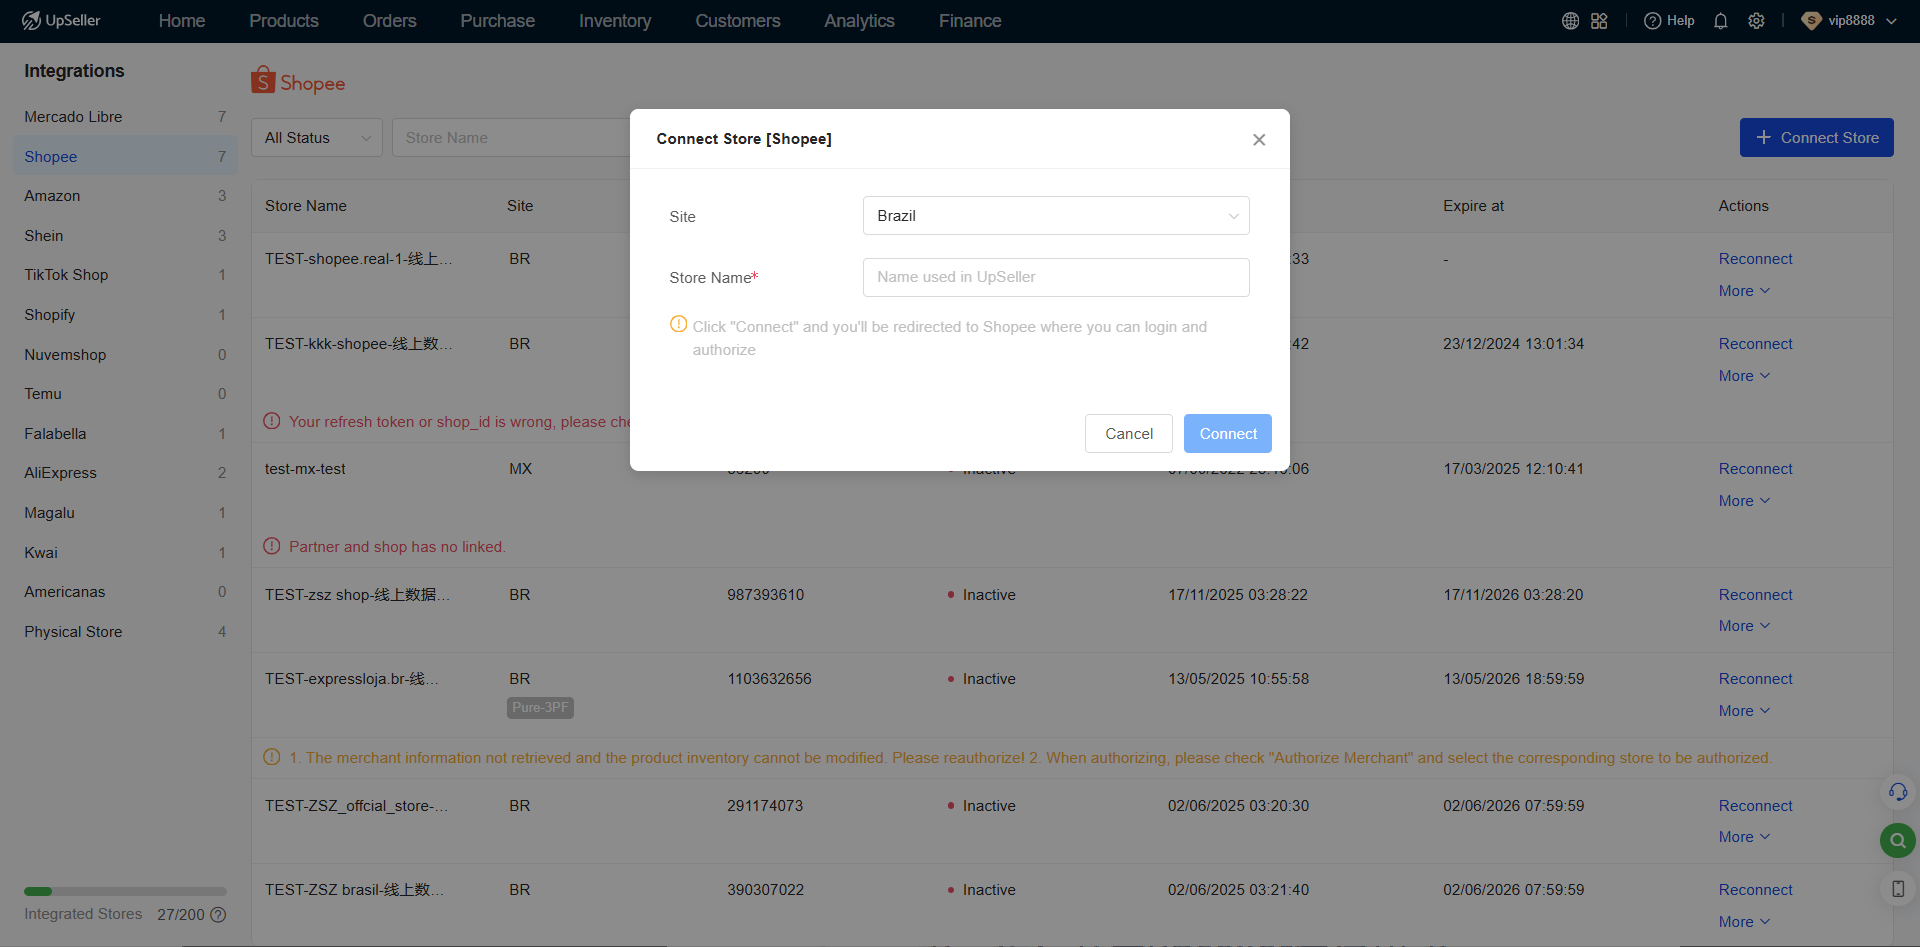
Step 4: Click > Authorize. You will be directed to the platform's authorization page to log in and complete the authorization.
Step 2: Create Product SKU
Important Notes:
SKU must be between 2 and 50 characters.
Only the following characters are allowed: numbers, letters, and special symbols: space, ( ), _, ., -, *, +, #.
Creation Method 1: Generate Product from Online Listing
Definition
UpSeller allows you to generate products directly from platform online listings and automatically match them, enabling quick product catalog setup and inventory management.
Operational Steps
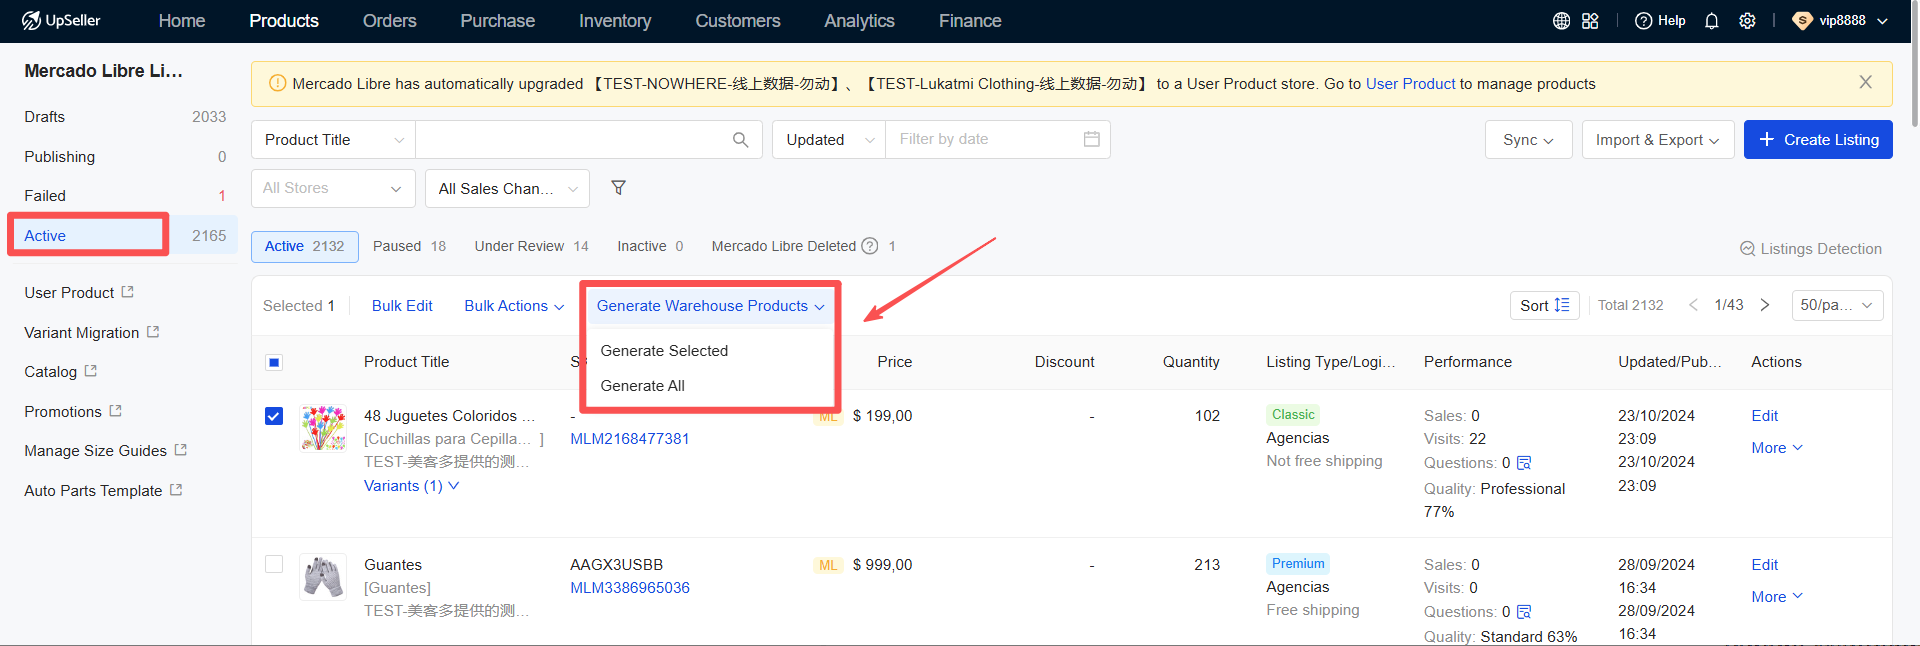
Step 1: Go to the Products module >> Mercado Online Listings (the following steps use Mercado Online Listings as an example) >> Generate Inventory Product >> Select Generate by Selection or Generate All.
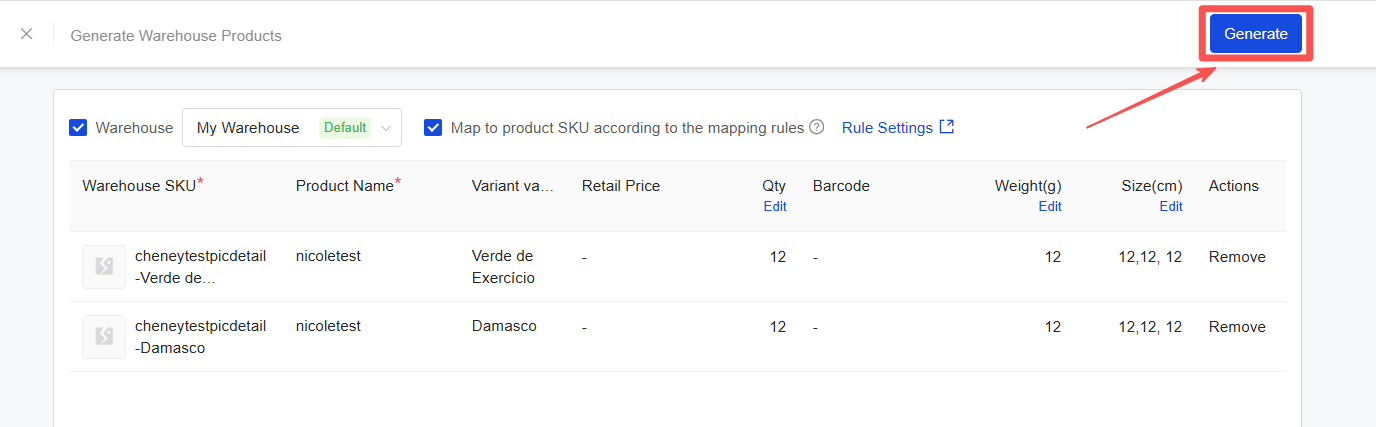
Step 2: Complete or modify the relevant product information. Once finished, click "Generate" to proceed.
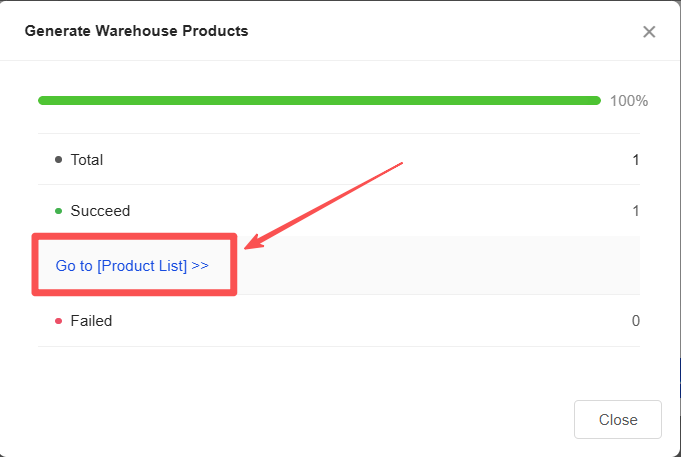
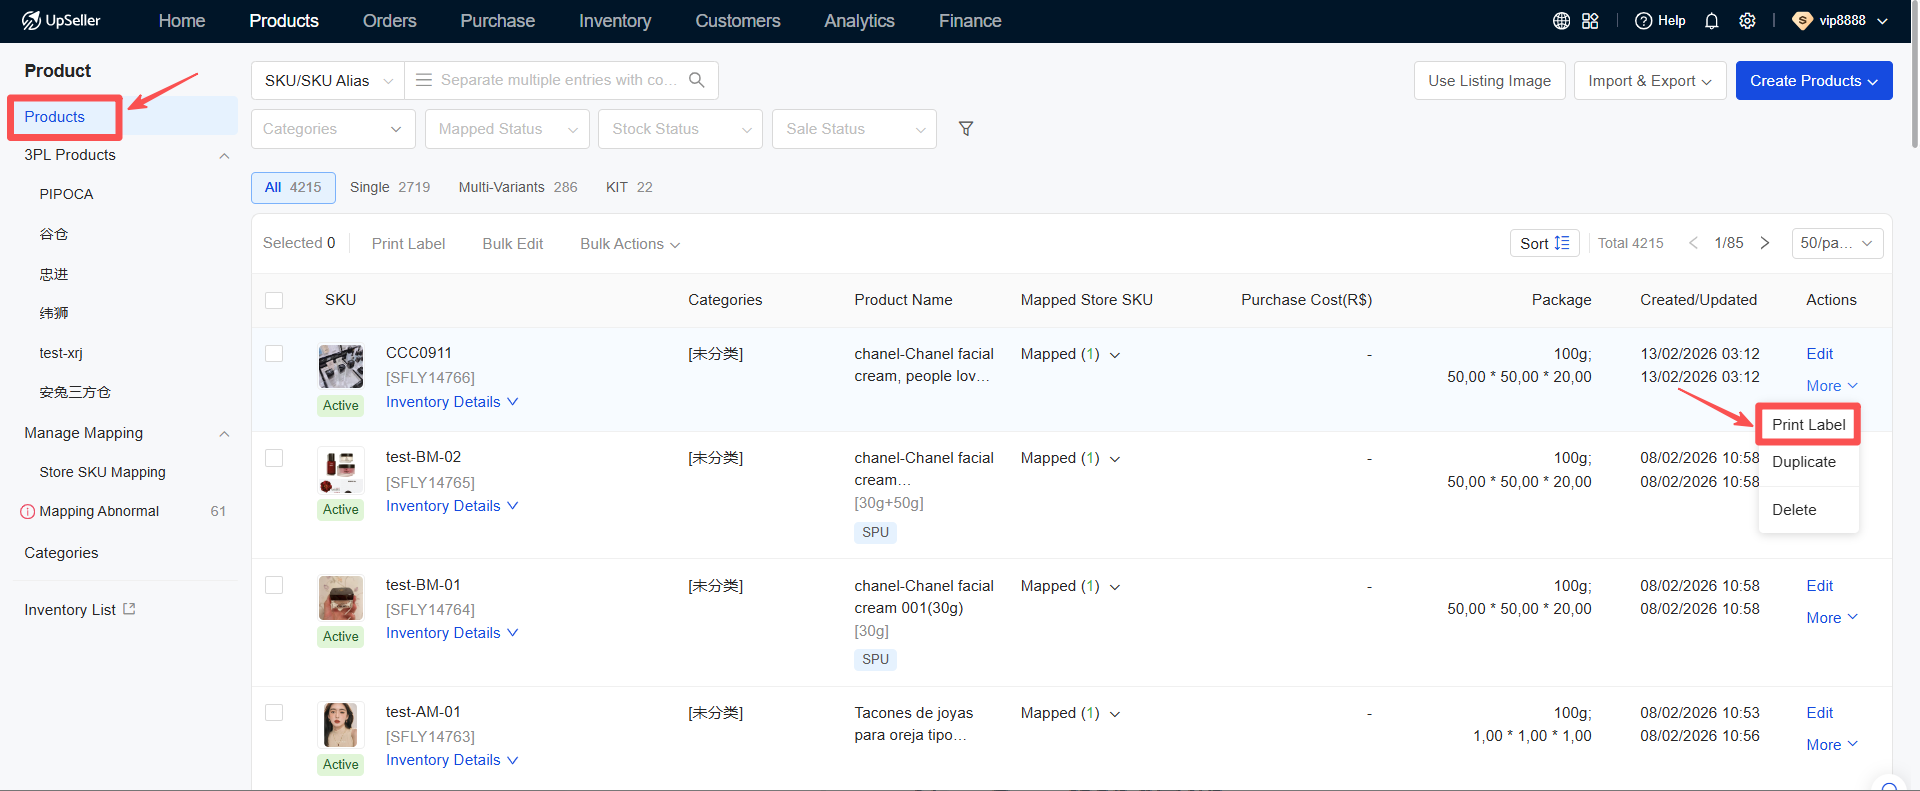
Step 3: After the product is successfully generated, click "Go to Product List" to view the product.
Creation Method 2: Import Product SKUs via Spreadsheet
This method is recommended if the store's seller center does not have SKUs filled in, or if the SKUs entered are inconsistent with those in the warehouse.
Operational Steps
Step 1: Go to the Products module >> Product List >> Import & Export.
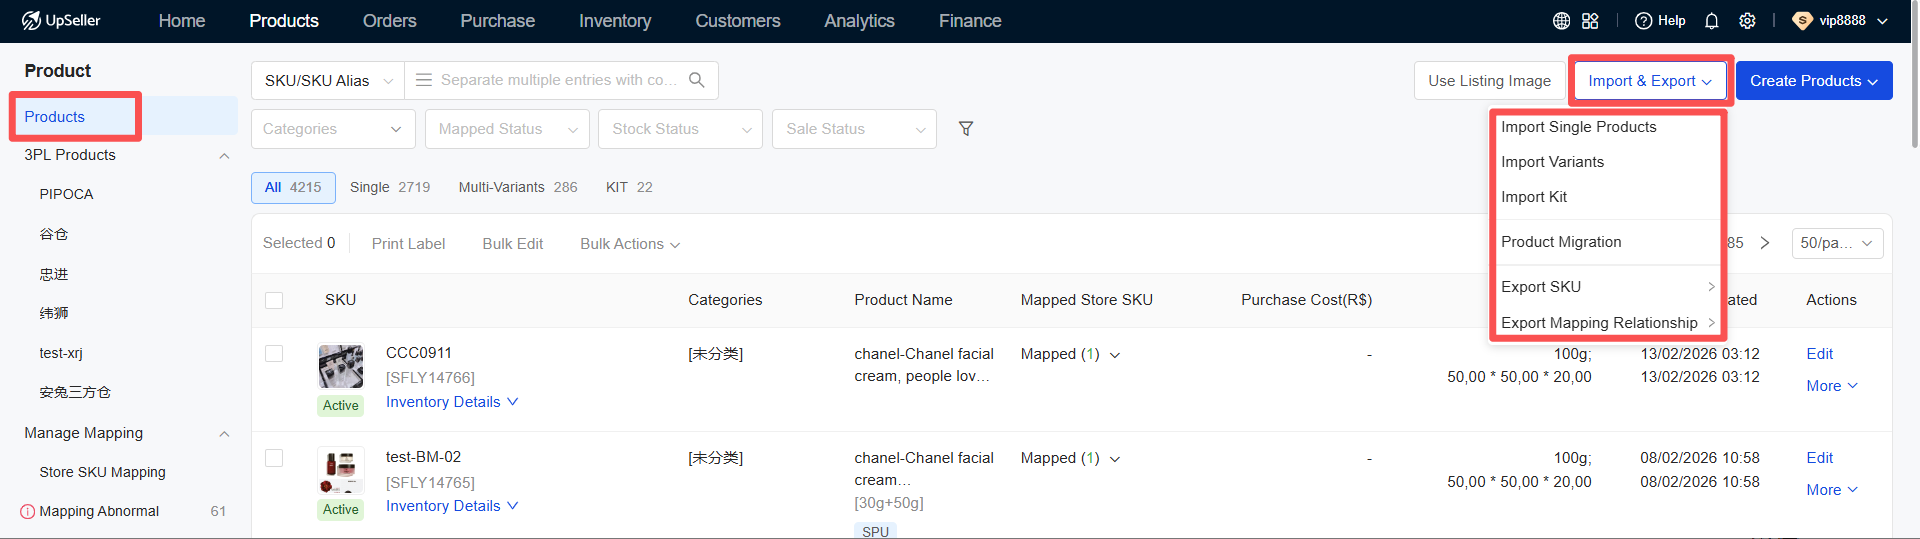
Step 2: Select Import Single Products, download the import template, fill in the template, upload the file, and click Import to complete.
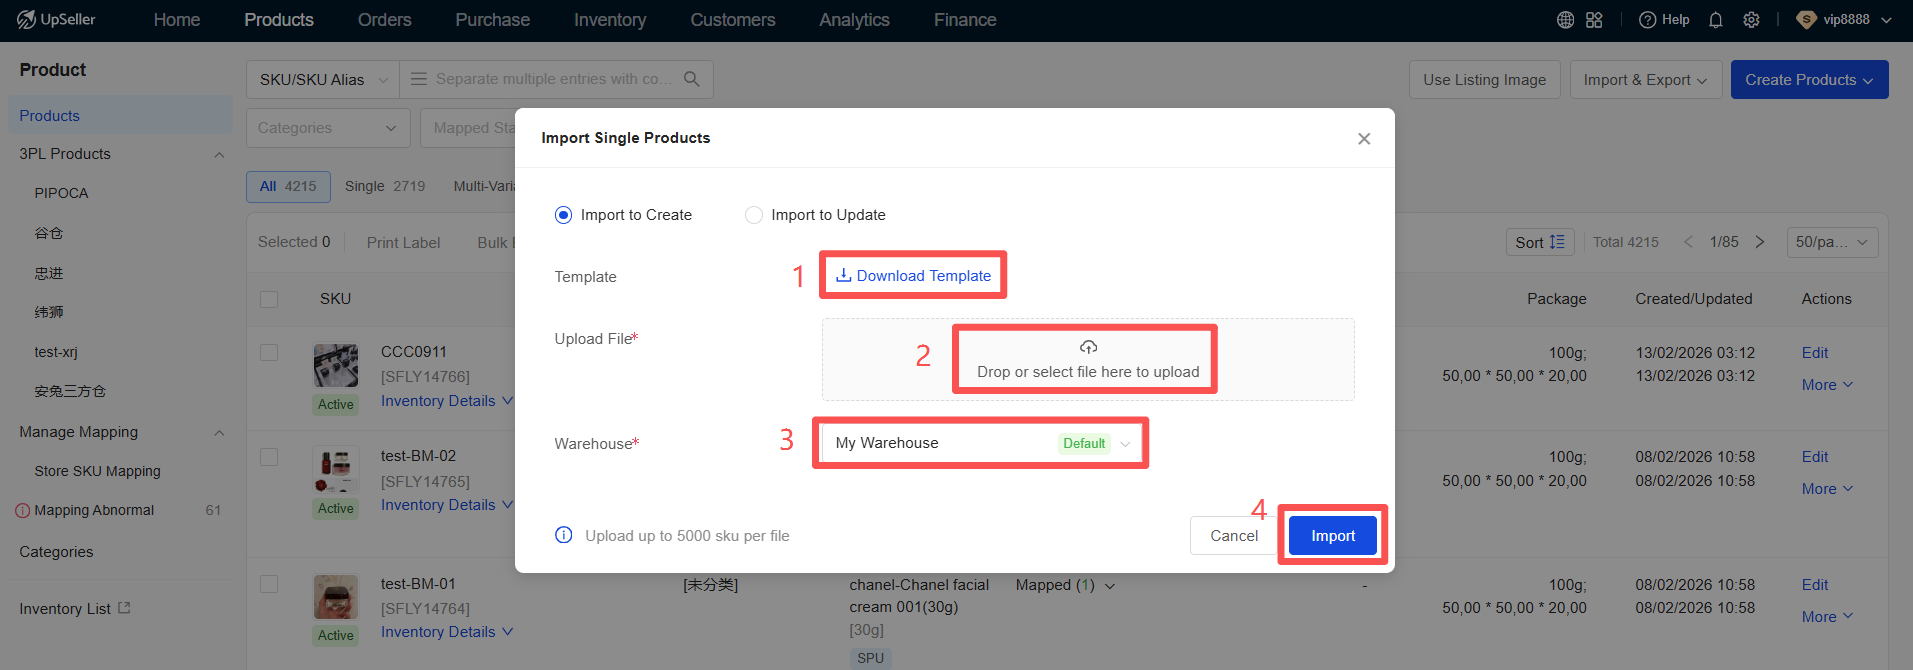
Note:
Import Limit: A maximum of 5,000 records can be imported at one time. If the spreadsheet exceeds 5,000 entries, the excess will not be imported. An error message will appear on the page and a failure report file will be generated, which can be downloaded for subsequent correction and re-import.
SKU Character Requirements: SKU must be between 2 and 50 characters in length. Only the following characters are allowed: numbers, letters, and special symbols: space, ( ), _, ., -, *, +, #.
Step 3: Enable UpSeller Inventory Function
The inventory function must be enabled before authorizing a third-party warehouse. The entry point to enable this function is as follows:
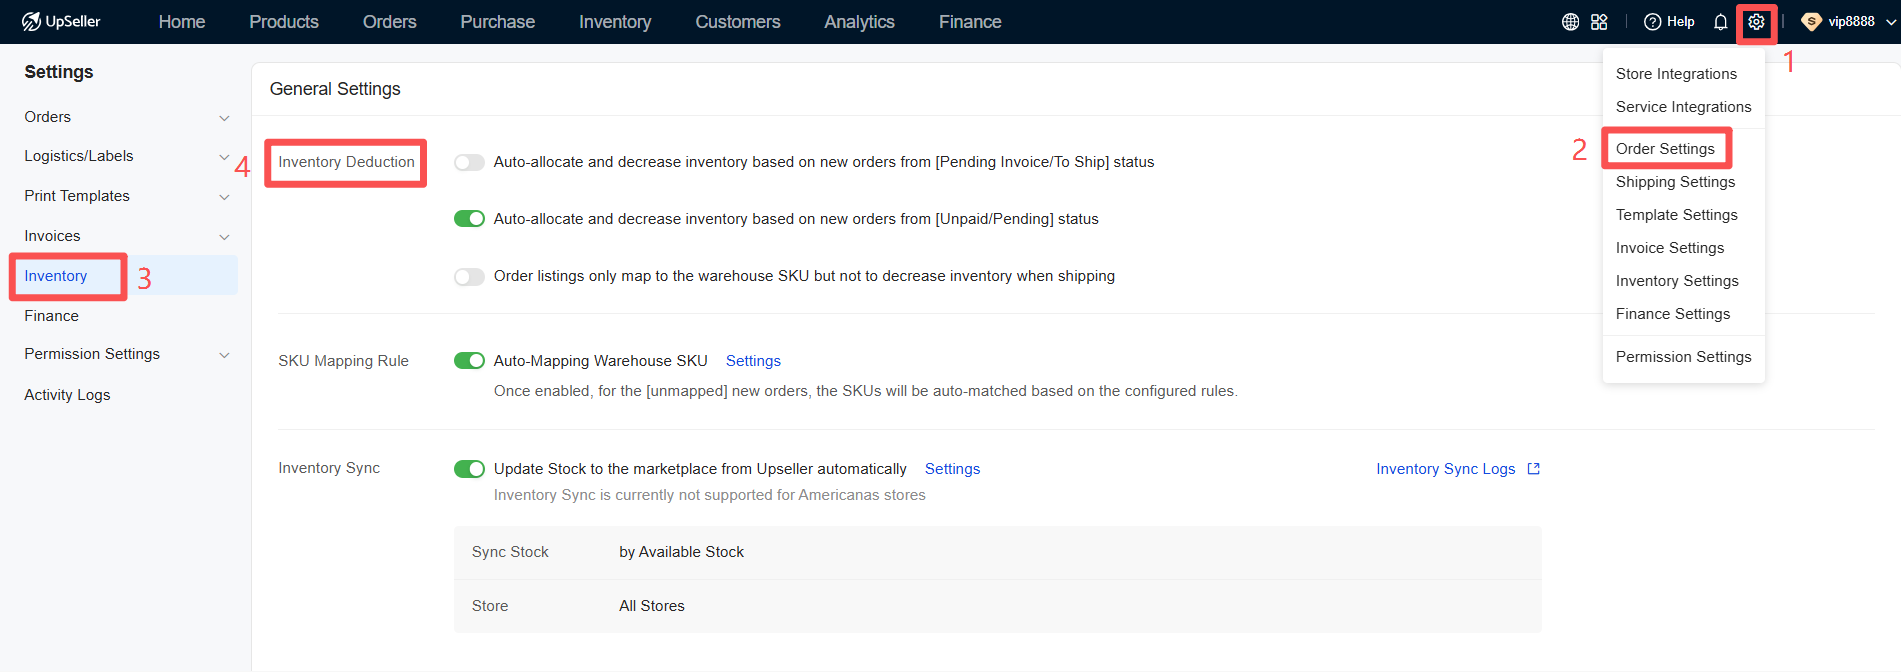
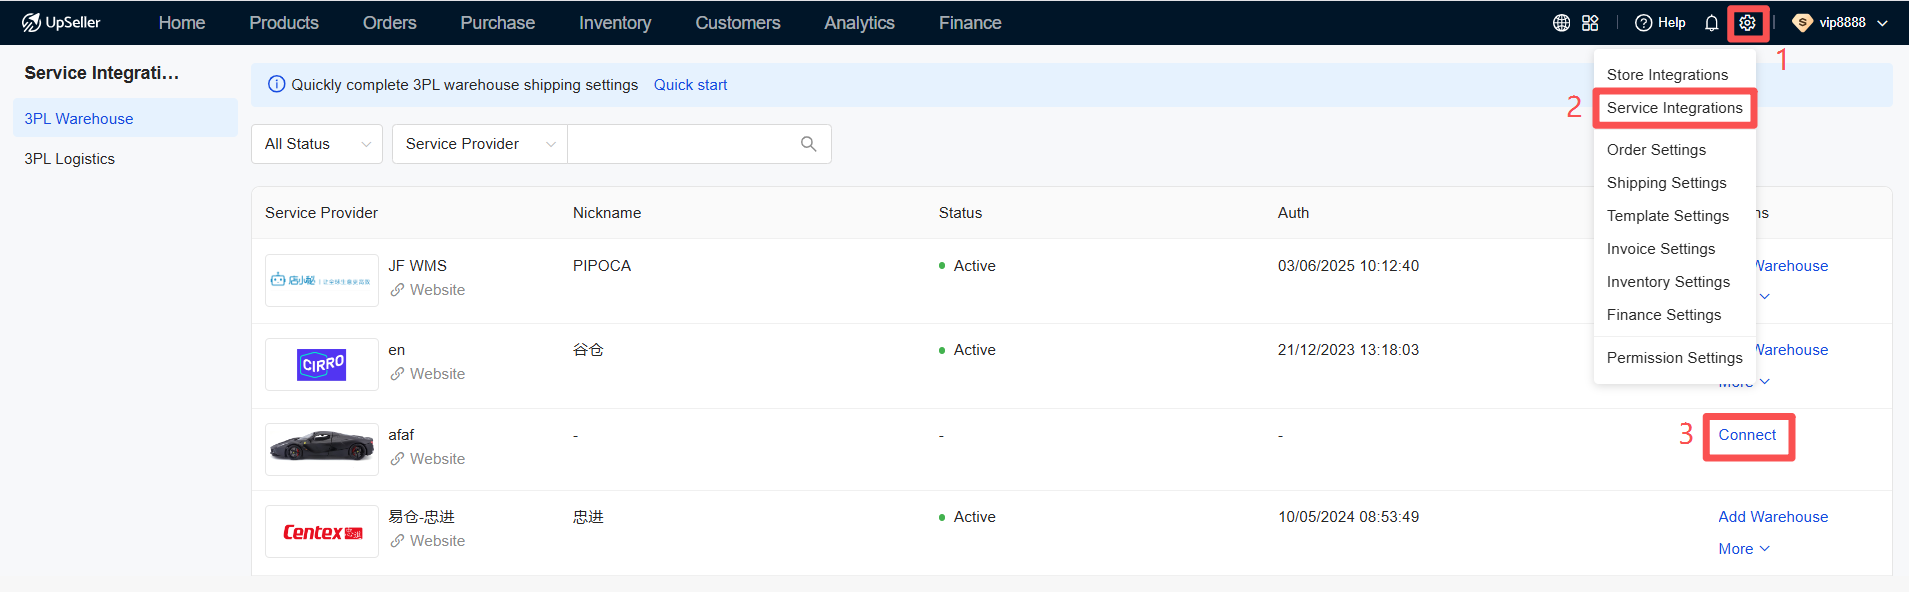
Step 4: Authorize Third-Party Warehouse
Step 1: Click "Settings" >> Click "Service Authorization" >> Select the Service Provider >> Click "Authorize".
Step 2: Complete the authorization information >> Click "Authorize" to finalize the third-party warehouse authorization.
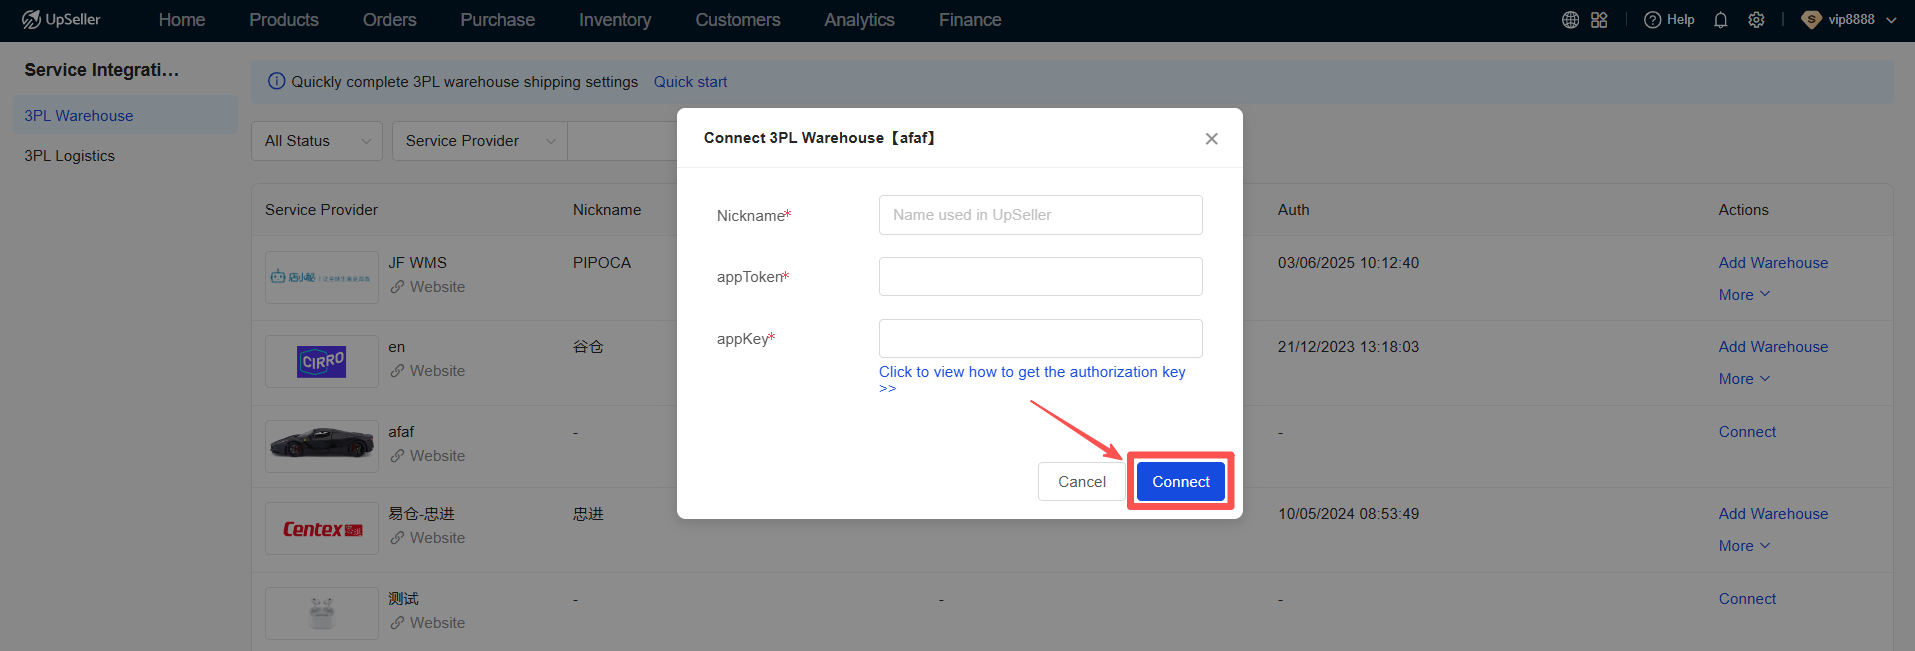
Note:
Nickname: Used only within UpSeller. It can be different from the actual third-party warehouse name for easier identification and management.
Email: The registered email address of the third-party warehouse, not the UpSeller registration email.
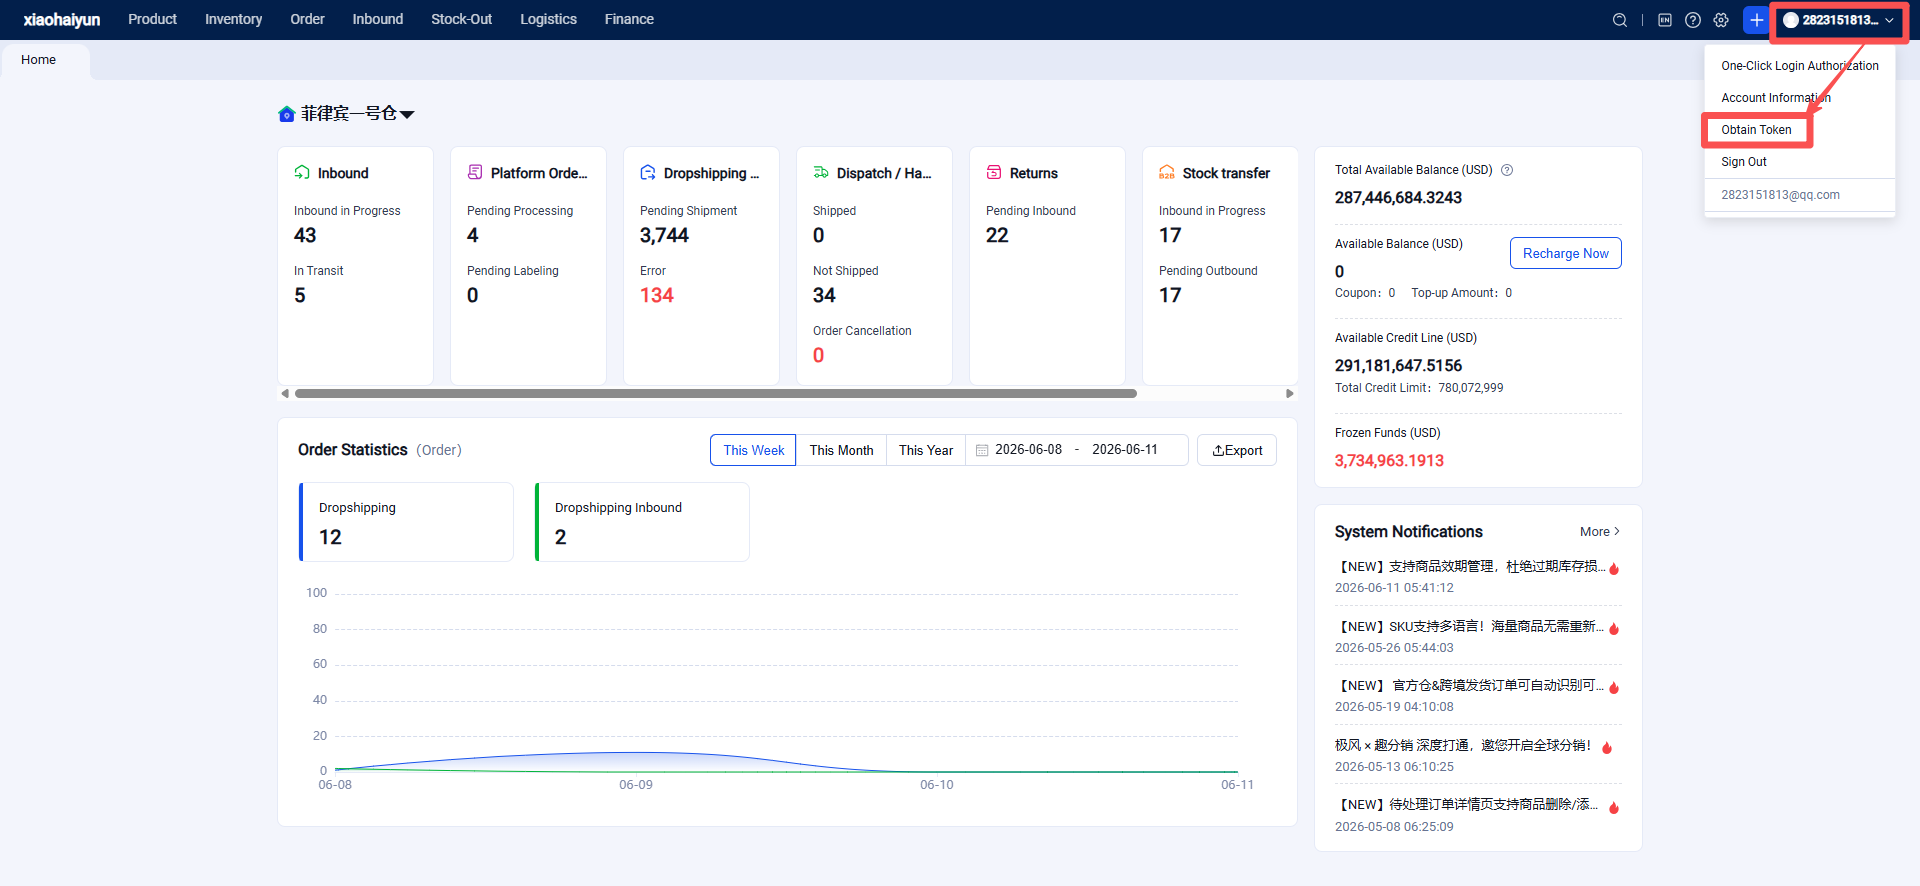
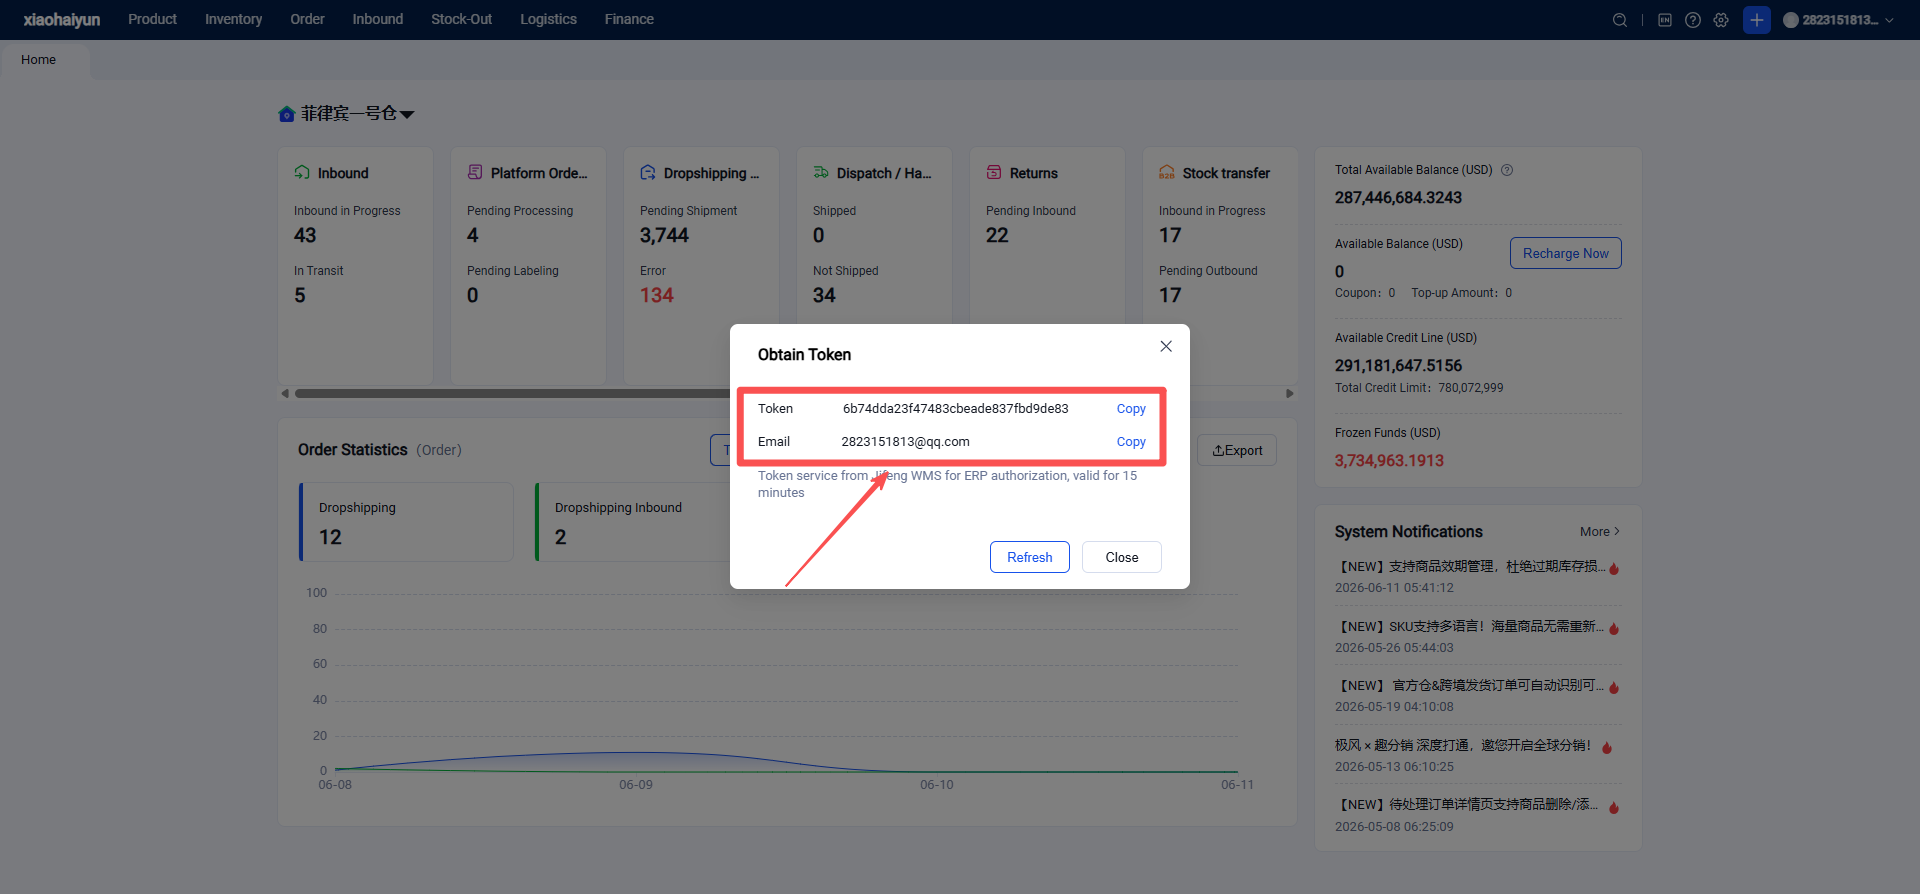
Token: The Token must be obtained from the third-party warehouse. As shown in the figure below, this is how to obtain the Token in PACIFIC.
Step 3: Create a Third-Party Warehouse
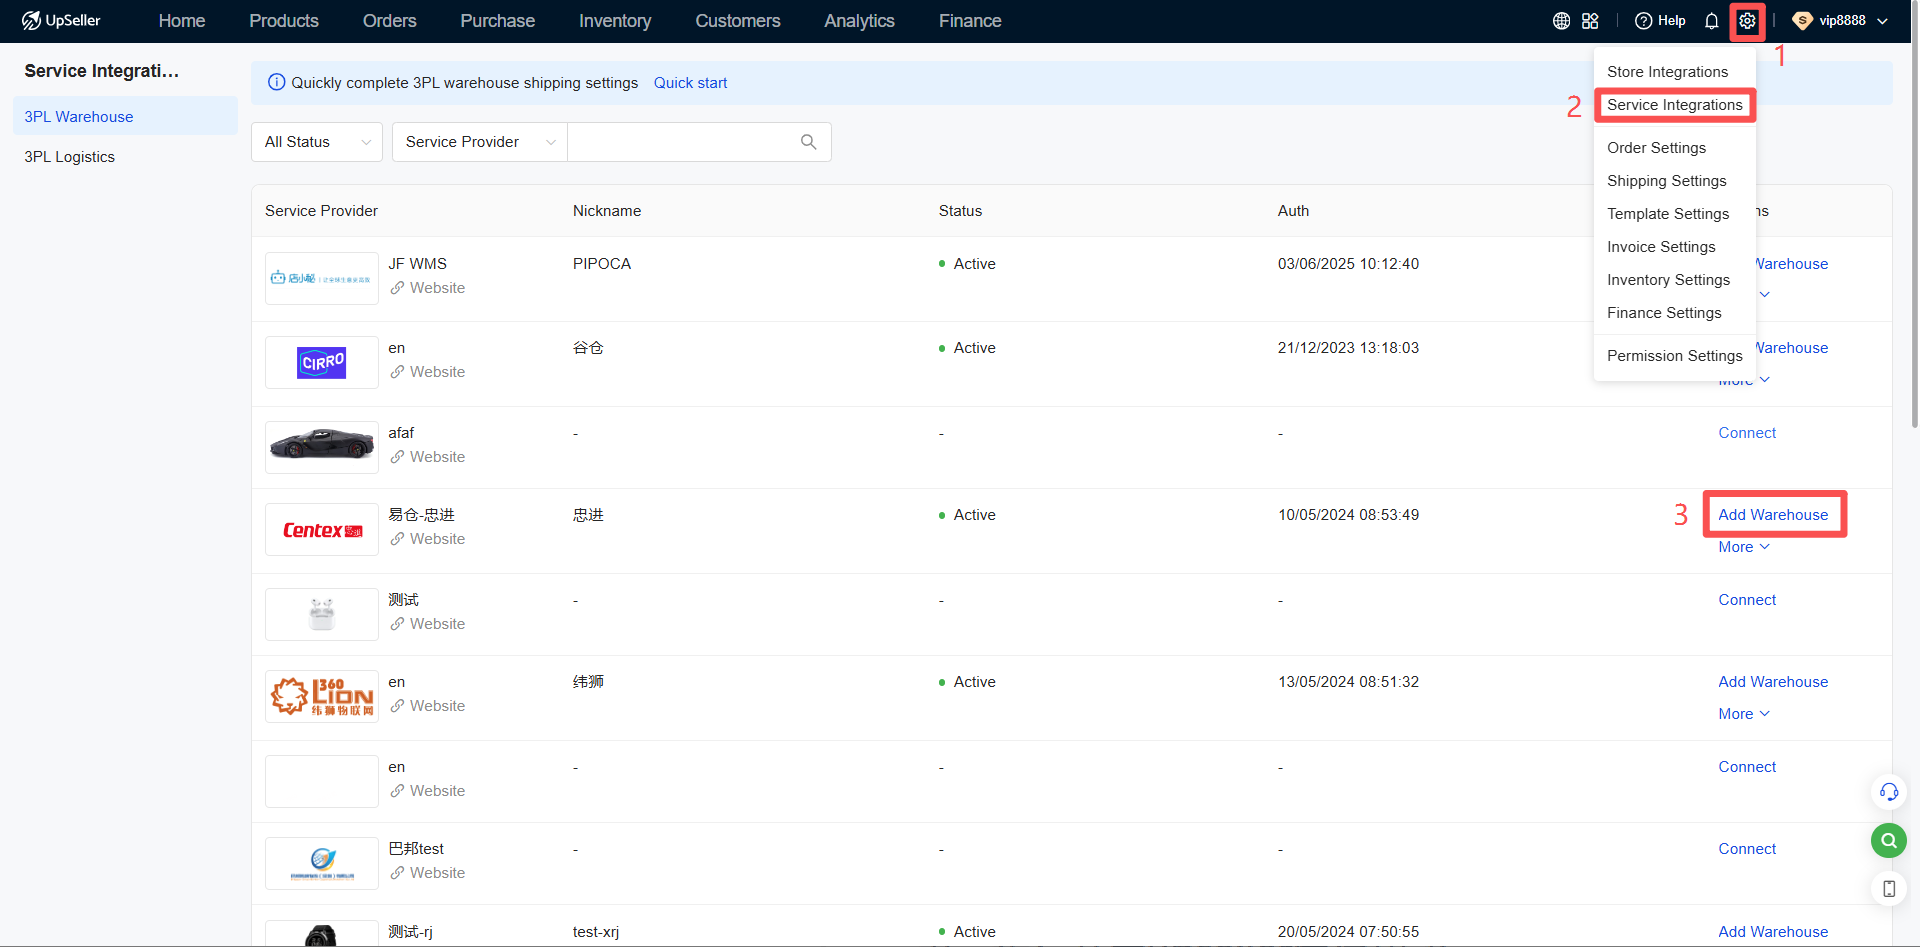
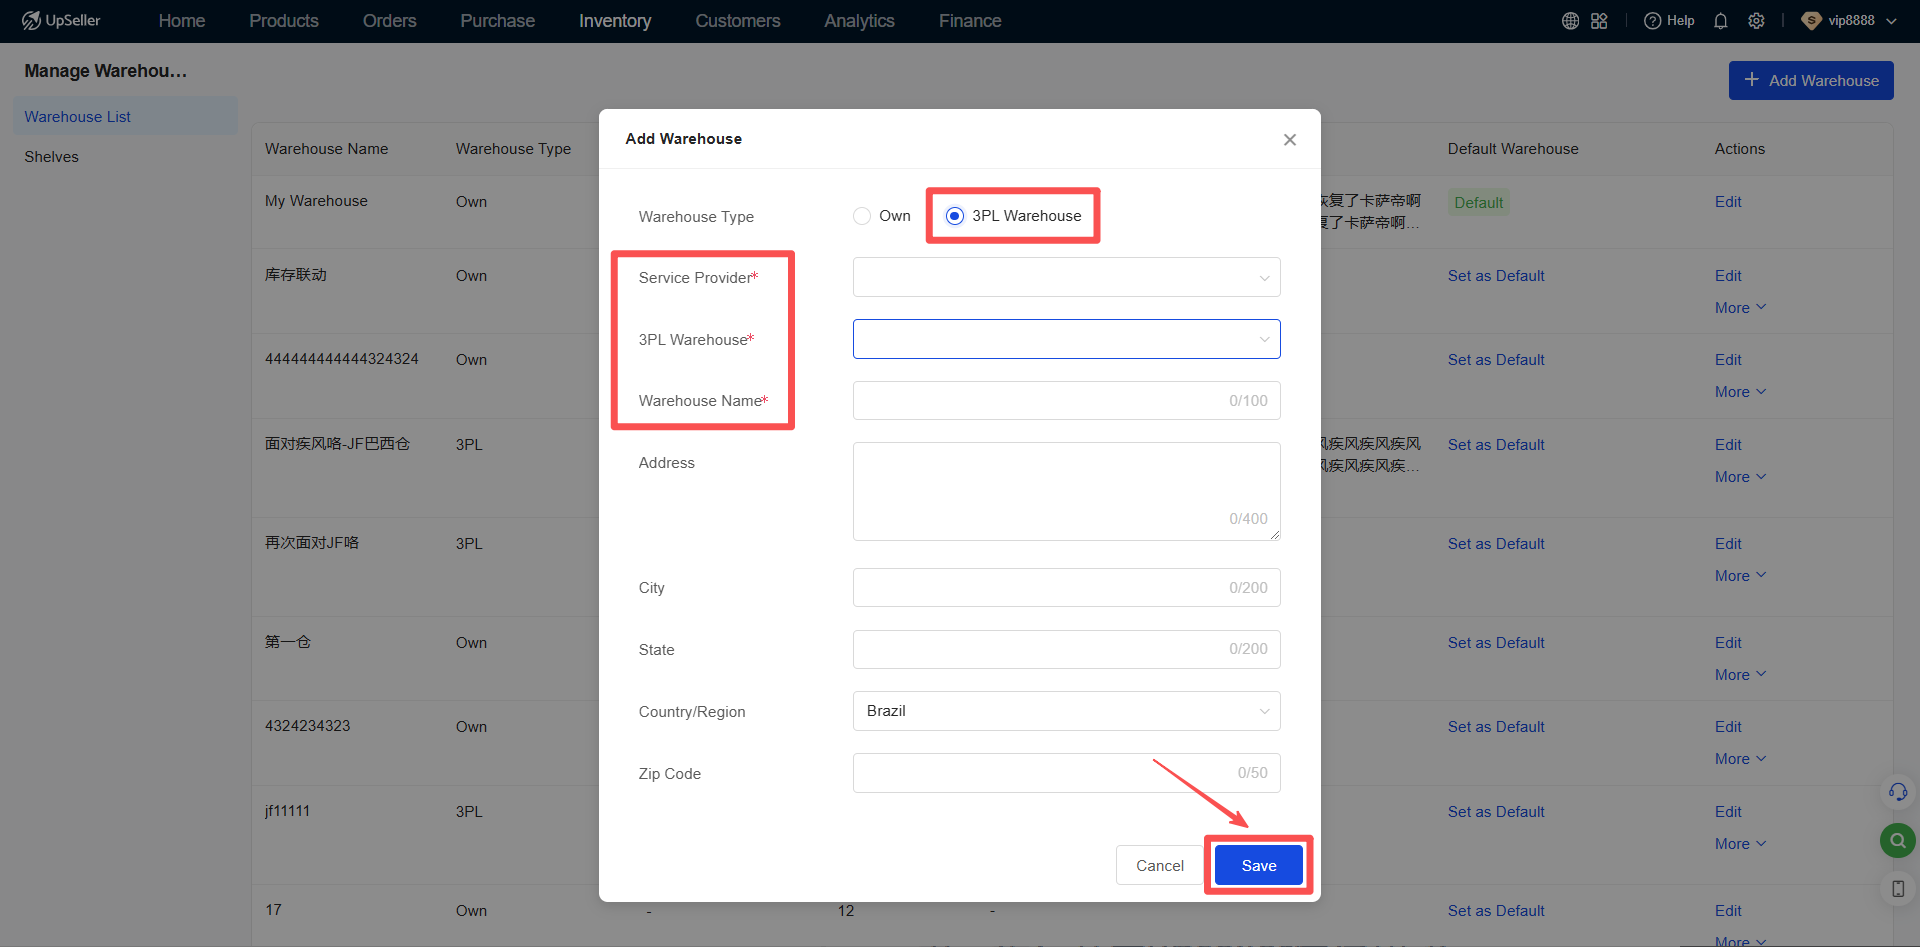
Entry Method 1: Click "Settings" >> Service Authorization >> Select the corresponding service provider >> Click "Add Warehouse".
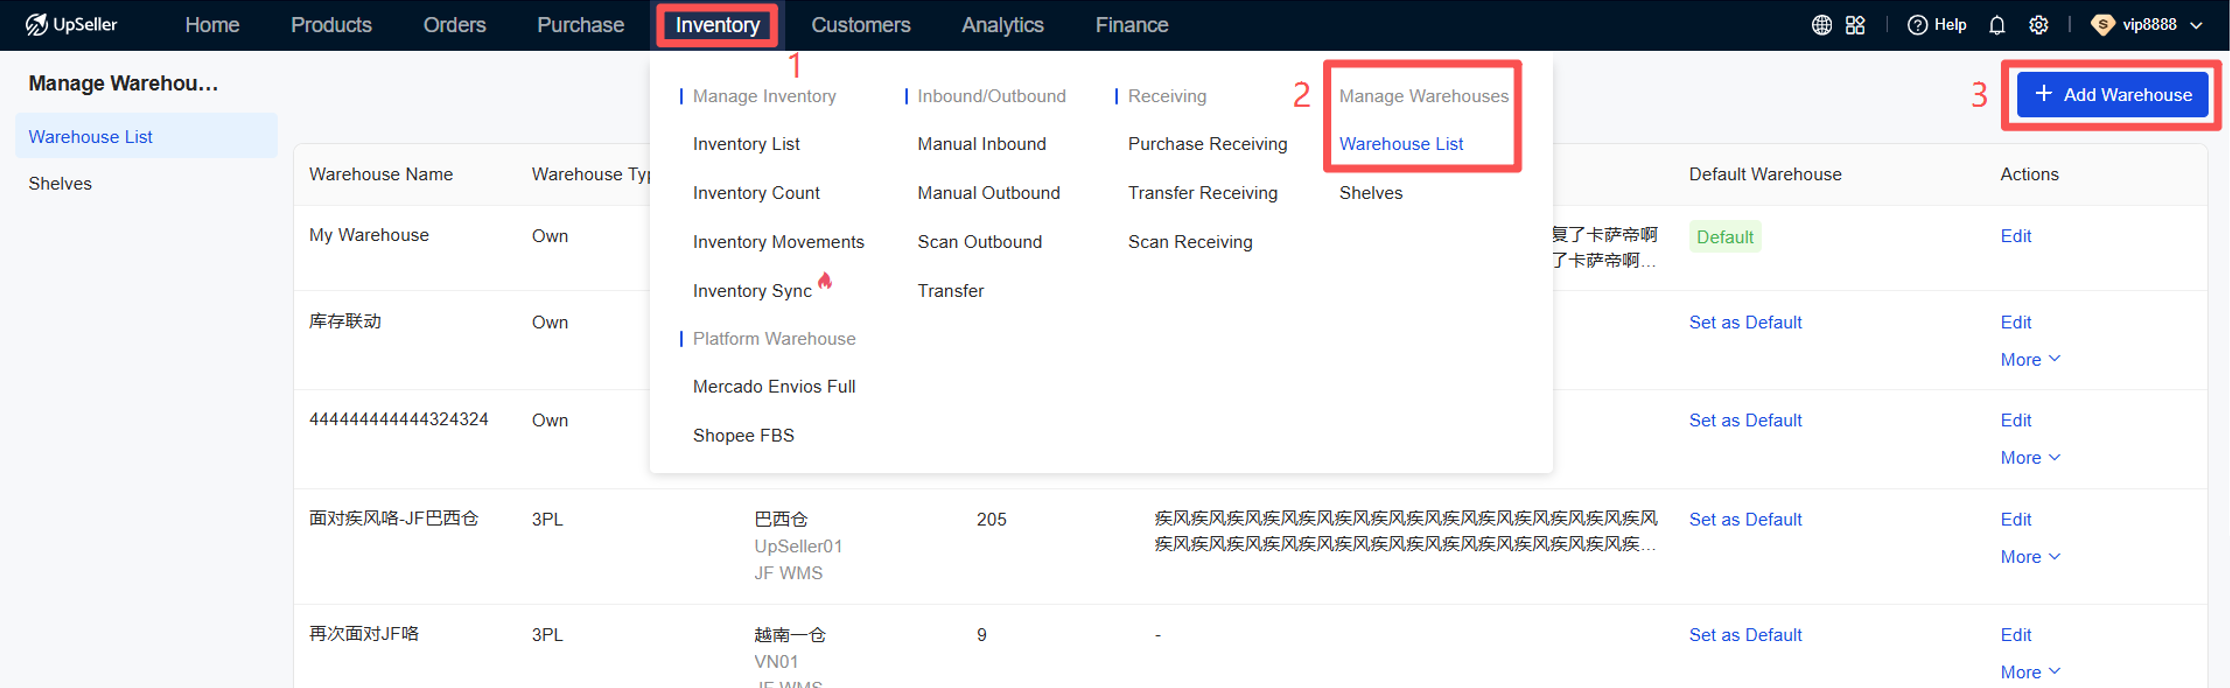
Entry Method 2: Click the "Inventory" module >> Warehouse Management >> Warehouse List, then click "Add Warehouse".
Complete the relevant information and save:
Service Provider: Displays only the list of authorized service providers.
Third-Party Warehouse: Shows all third-party warehouses under the selected service provider (if a third-party warehouse has already been created, it will not appear in this list).
Warehouse Name: Customizable name. It is recommended to name it according to the actual warehouse name for easier future management.
Address Information: Optional field. It is recommended to fill in based on the actual warehouse location for better management later.
Step 5: Push Product SKU
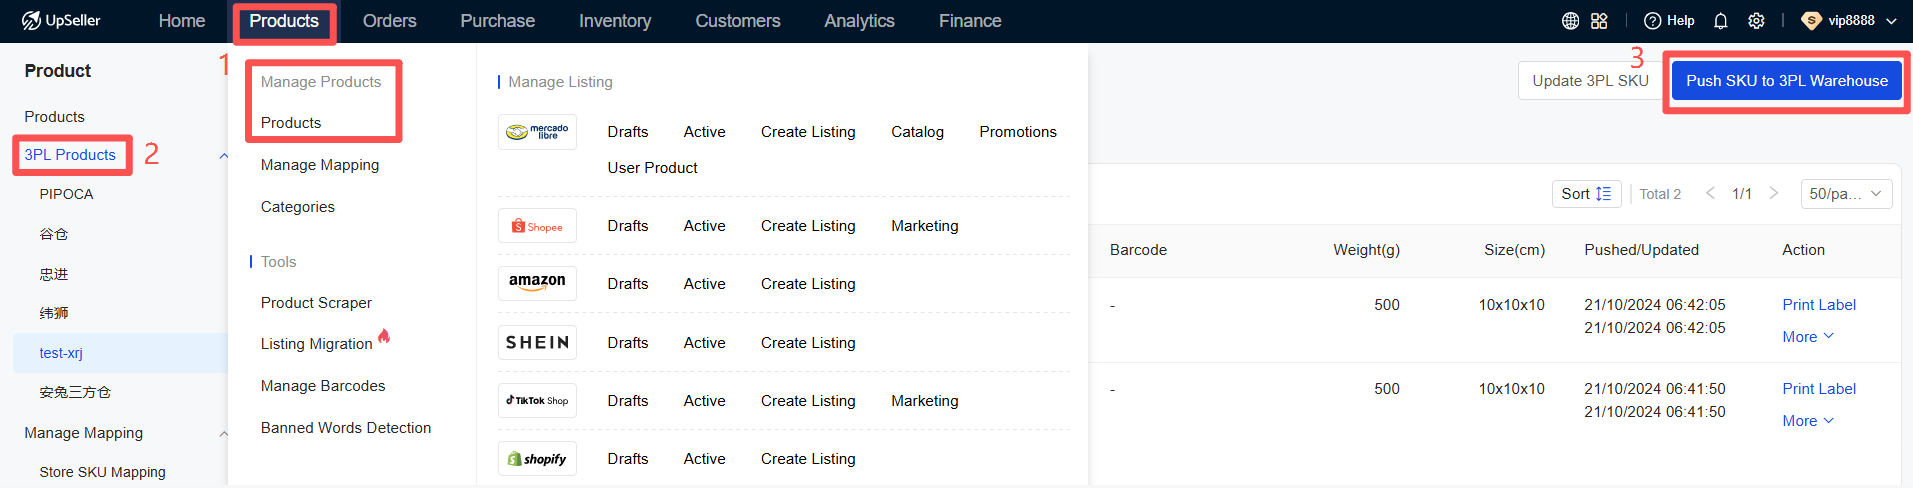
Step 1: Click the "Products" module >> Select "Product Management - Product List" >> Third-Party Warehouse Products, then click "Push Products to Third-Party Warehouse".
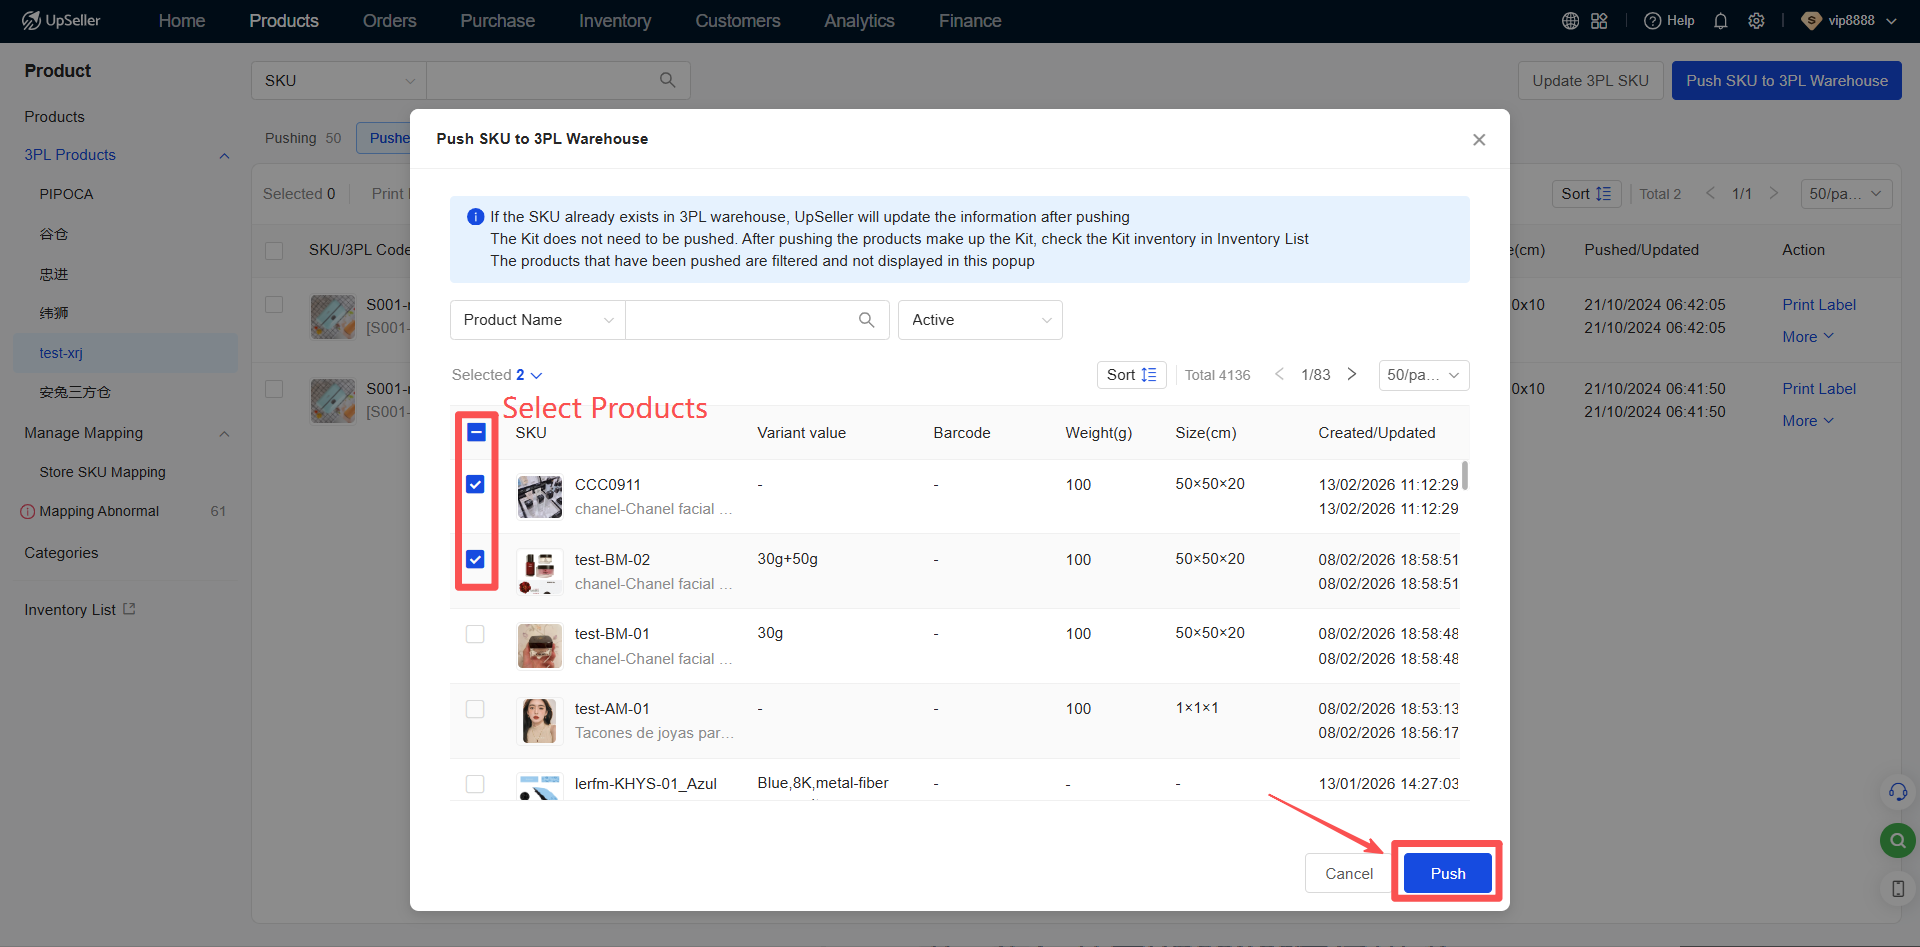
Step 2: Select the product SKUs to be pushed > Click "Push".
Note: The product push list displays all product SKUs from the UpSeller product list. SKUs that have been previously pushed successfully or have failed to push are filtered out.
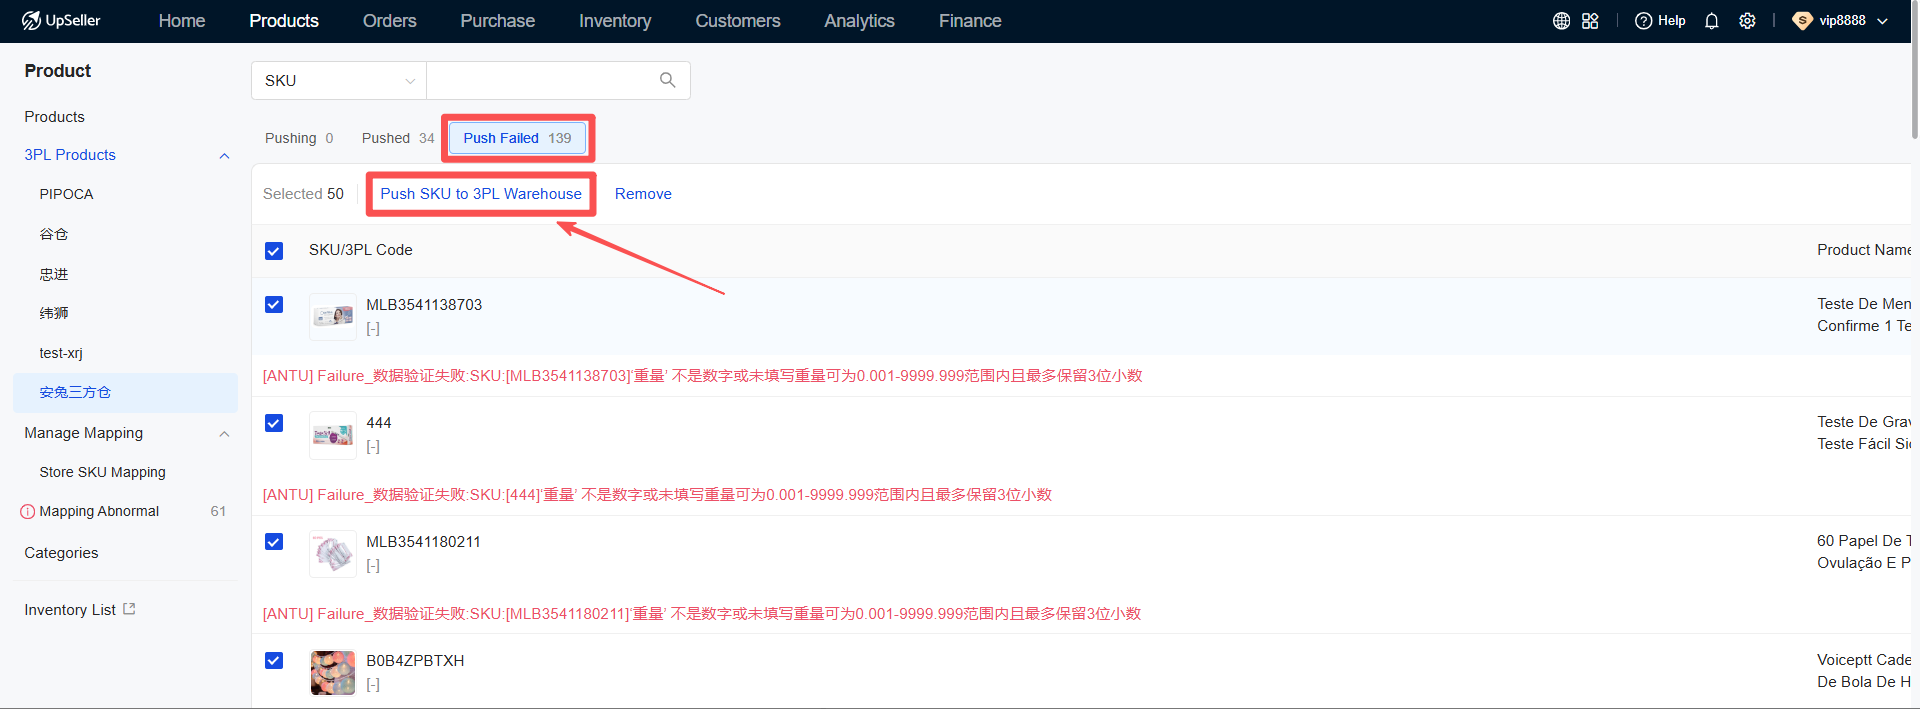
Step 3: Check the Push Status
Push Successful: The product will appear in the "Pushed" list.
Push Failed: The product will appear in the "Push Failed" list and can be retried for pushing to the third-party warehouse.
Step 4: Introduction to Product SKU Push Status
[The table is still loading. Please wait for the loading to complete before attempting to copy.]
Step 6: Push Purchase Order

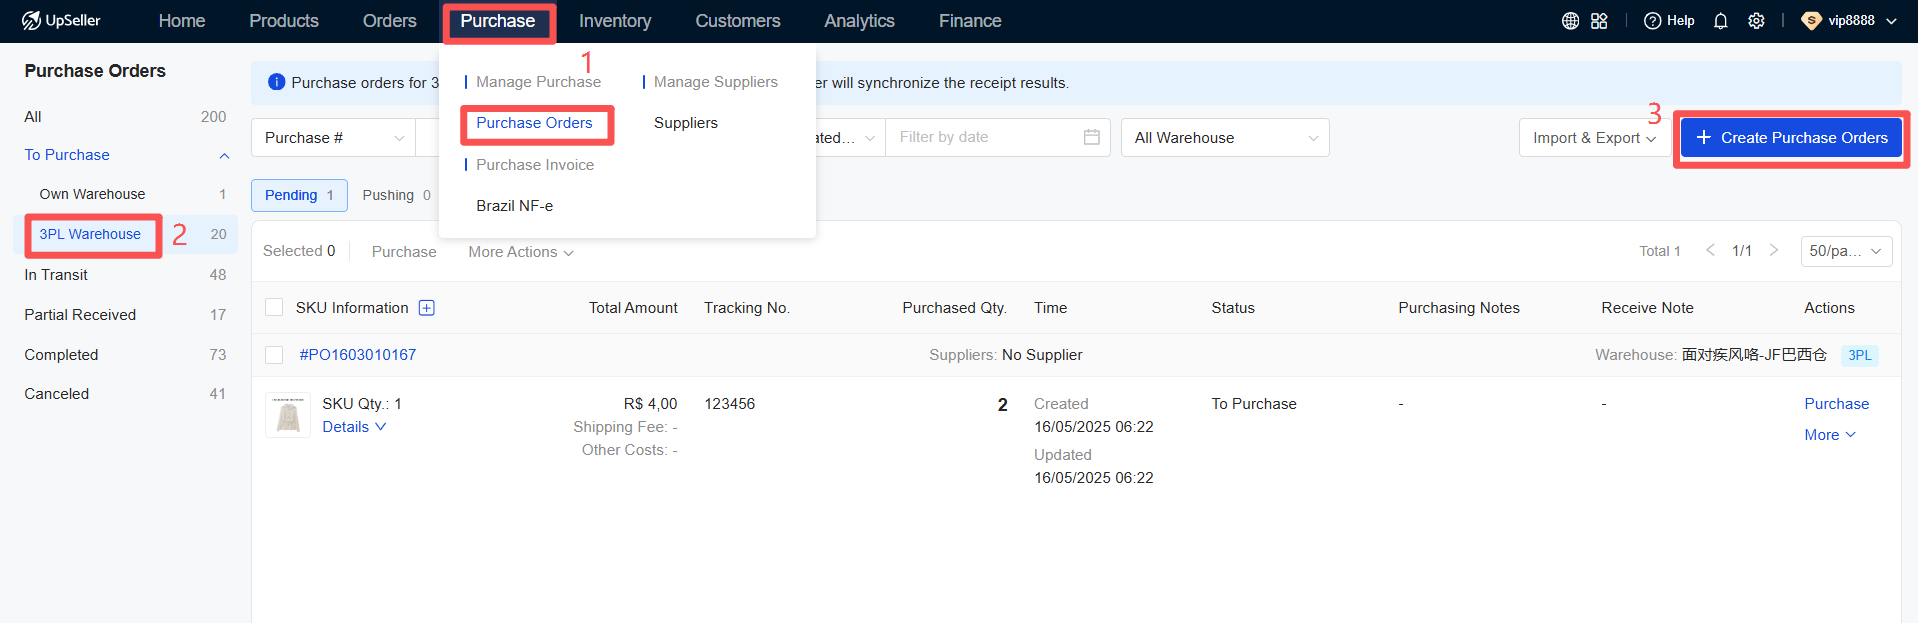
Step 1: Click the "Purchases" module >> Purchase Management - Purchase Order, select the third-party warehouse, and click "Create Purchase Order".
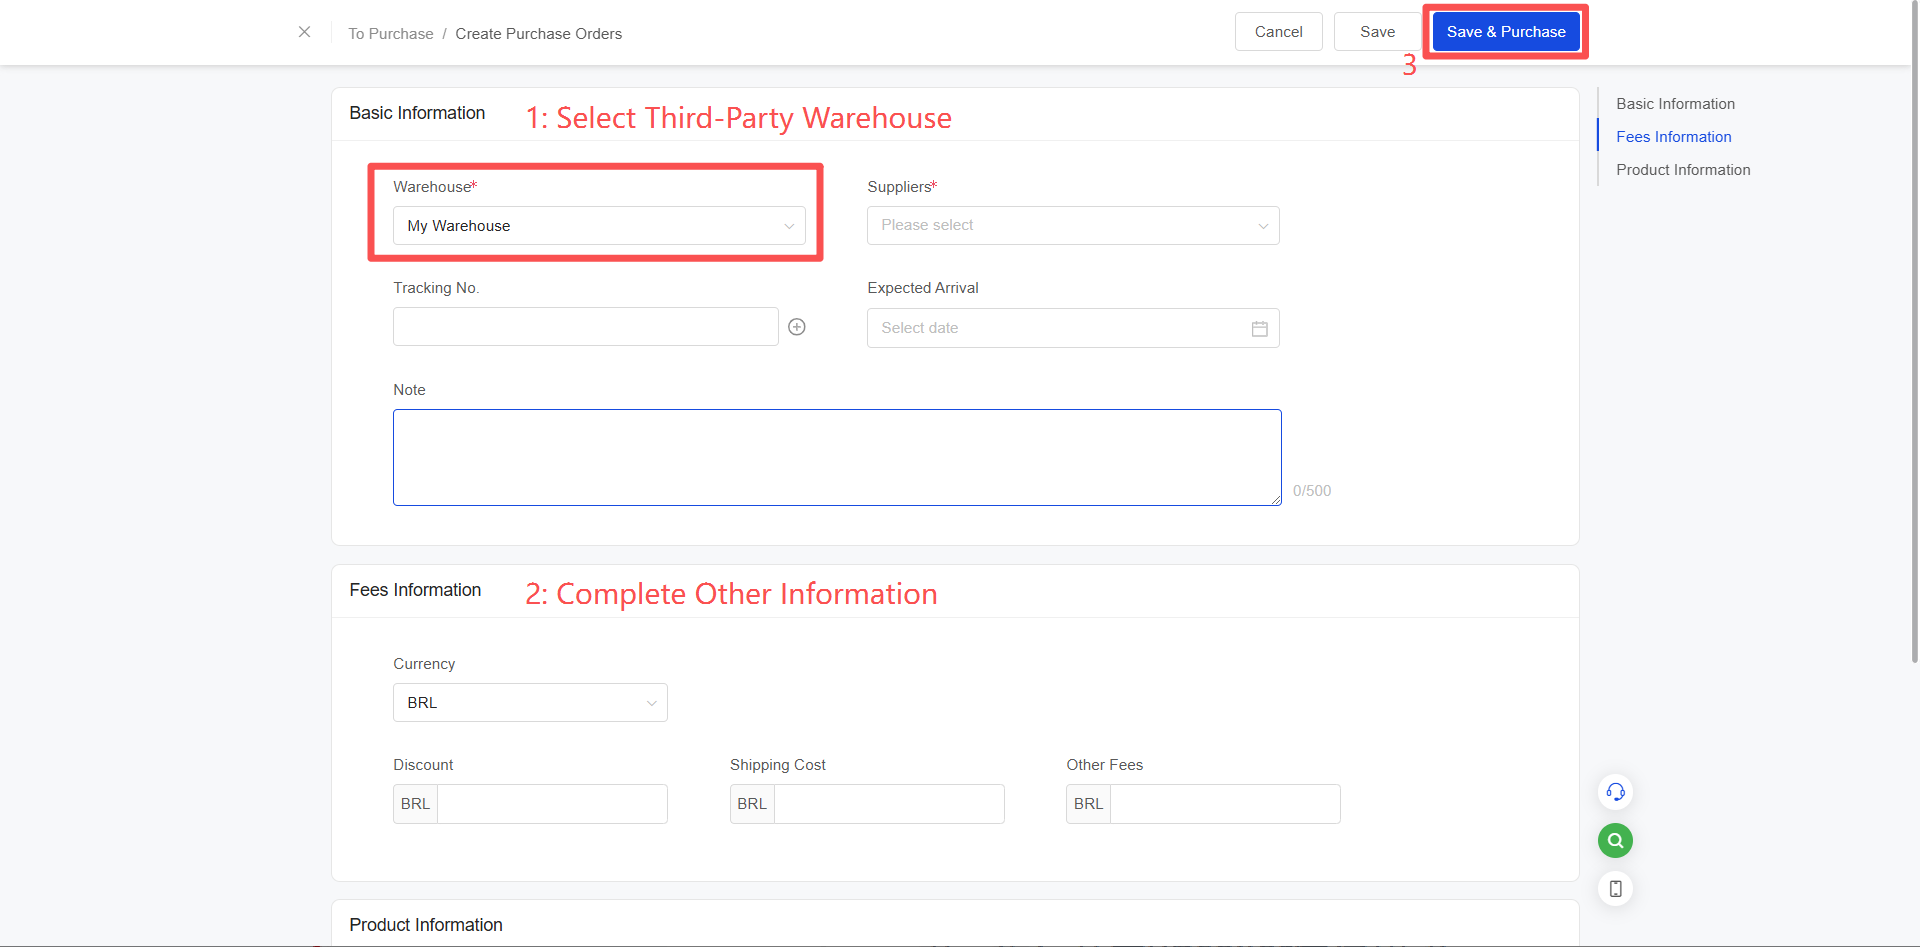
Step 2: Select the Third-Party Warehouse as the warehouse, complete the remaining purchase order information, and click [Save] or [Save & Purchase] .
[Save] : The purchase order enters the "Pending Purchase" status.
[Save & Purchase] : The purchase order enters the "In Transit" status.
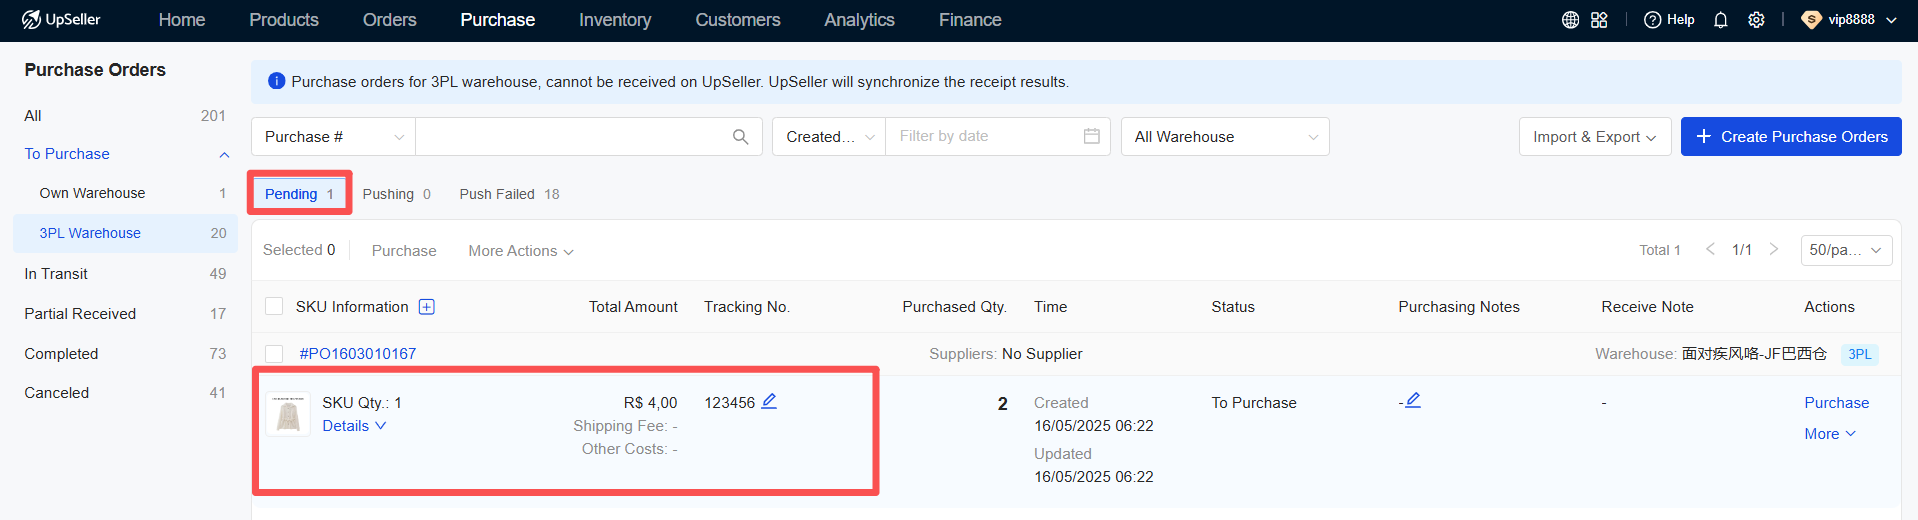
Step 3: Check Push Status
Pushing: The purchase order is currently being pushed to the third-party warehouse.
Push Failed: The purchase order push operation to the third-party warehouse has failed (specific failure reasons can be viewed).
Push Successful: The purchase order has been successfully pushed to the third-party warehouse. The purchase order enters the "In Transit" status. Cancellation of the purchase order is not supported in this status!
Step 4: System Automatically Synchronizes Third-Party Warehouse Receiving Results
If the third-party warehouse receives all the goods according to the quantities specified in the purchase order, the purchase order will move to the "Completed" list.
If the third-party warehouse receives only part of the goods according to the quantities specified in the purchase order, the purchase order will move to the "Partially Received" list.
Supported Operations for Third-Party Warehouse Purchases in the System:
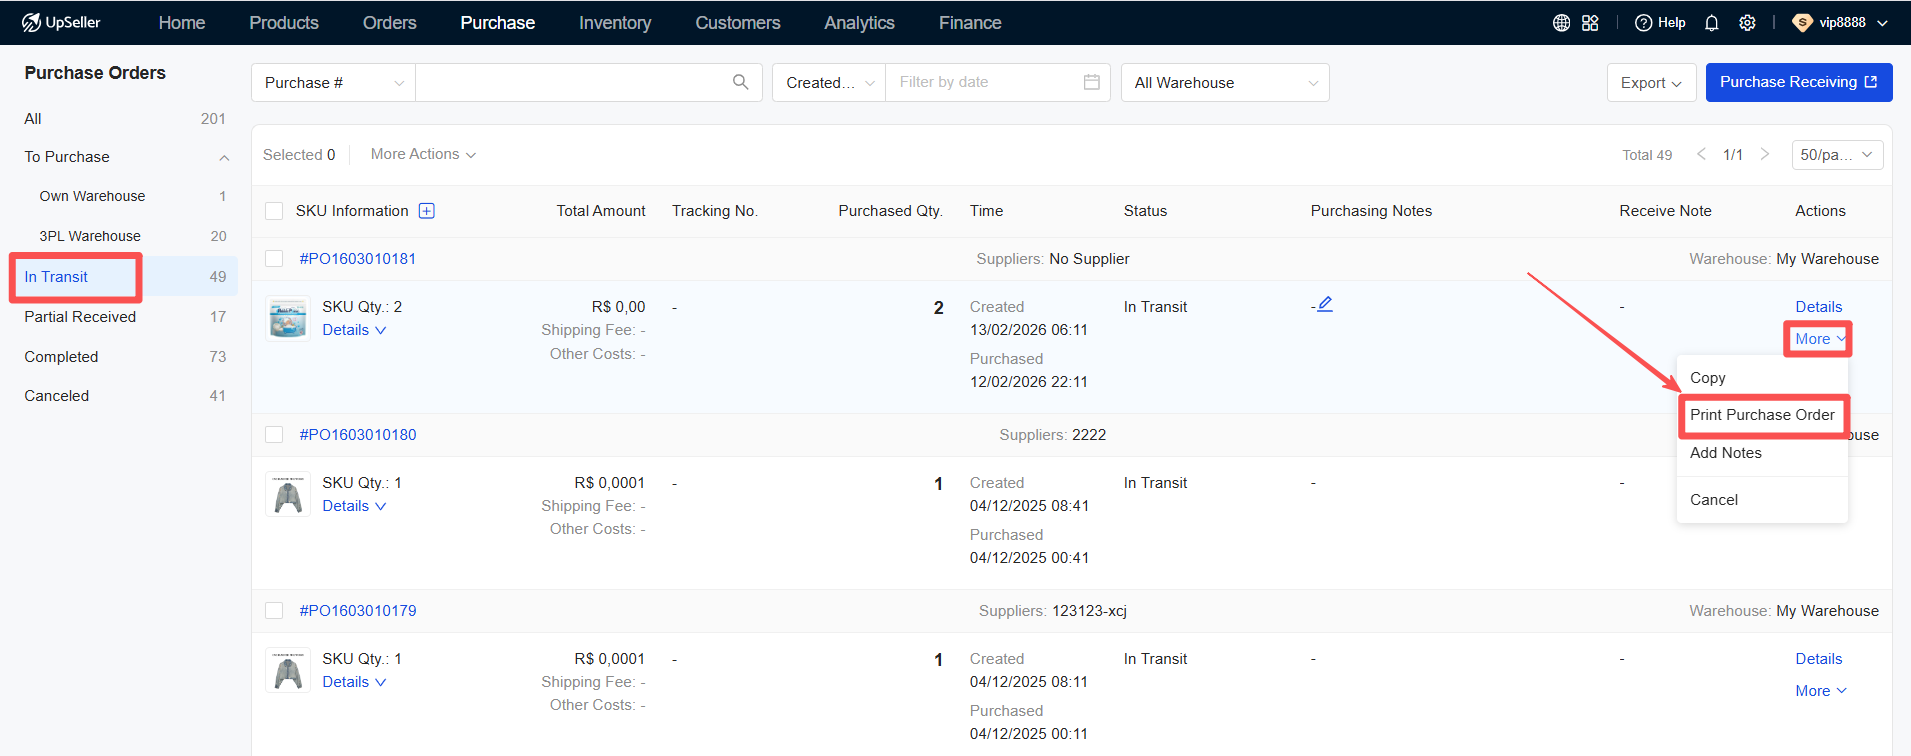
Print Purchase Order List: The specific operational steps are shown in the figure below.
Step 7: Synchronize Third-Party Warehouse Inventory
Note: This step can only be performed after the warehouse has initialized inventory or after your purchase order has been completed.
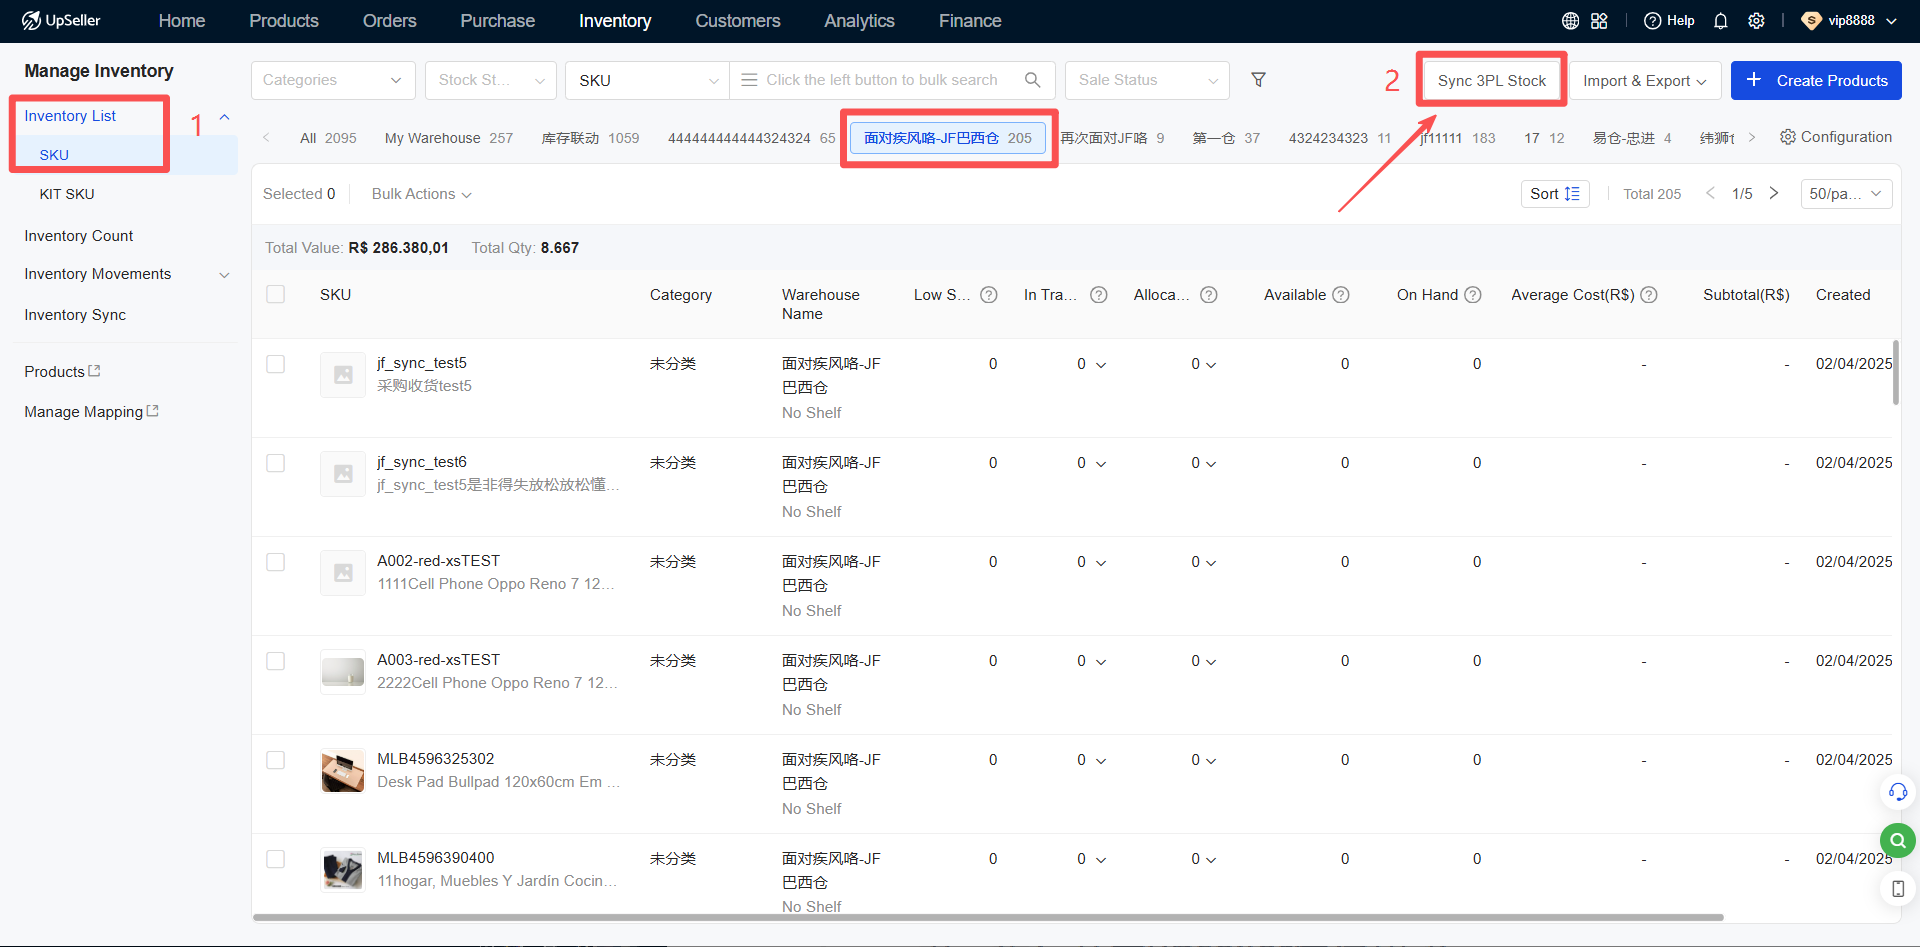
Step 1: Click the "Inventory" module >> Inventory Management - Inventory List >> Select the Third-Party Warehouse >> Click "Sync Third-Party Warehouse Inventory".
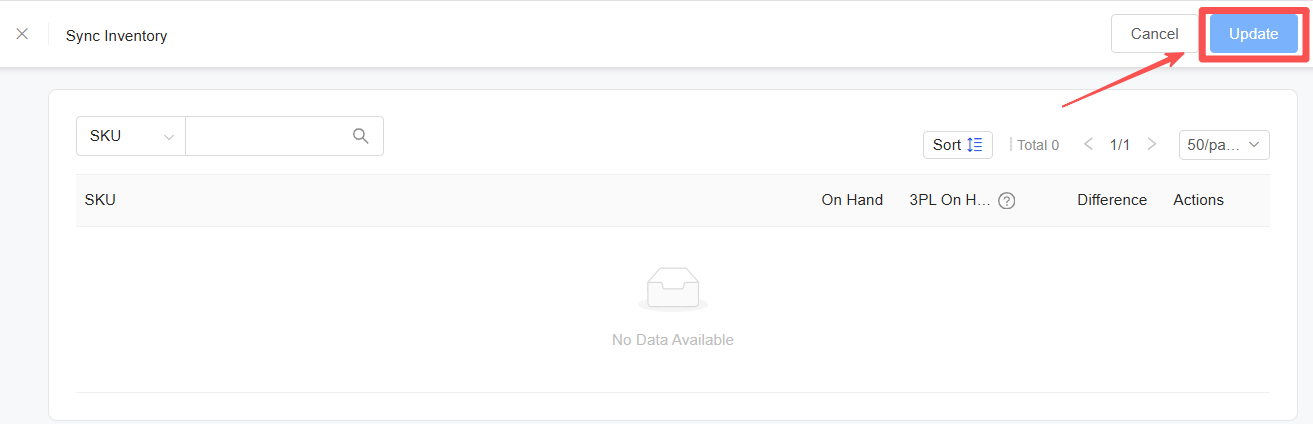
Step 2: Review the inventory data (UpSeller Current Inventory, Third-Party Warehouse Current Inventory, Inventory Discrepancy) >> Click "Update".
Note: The Third-Party Warehouse Current Inventory has already excluded defective stock.
The system supports the following operations for third-party warehouse products:
Print Product SKU Labels
Set Low Stock Alerts
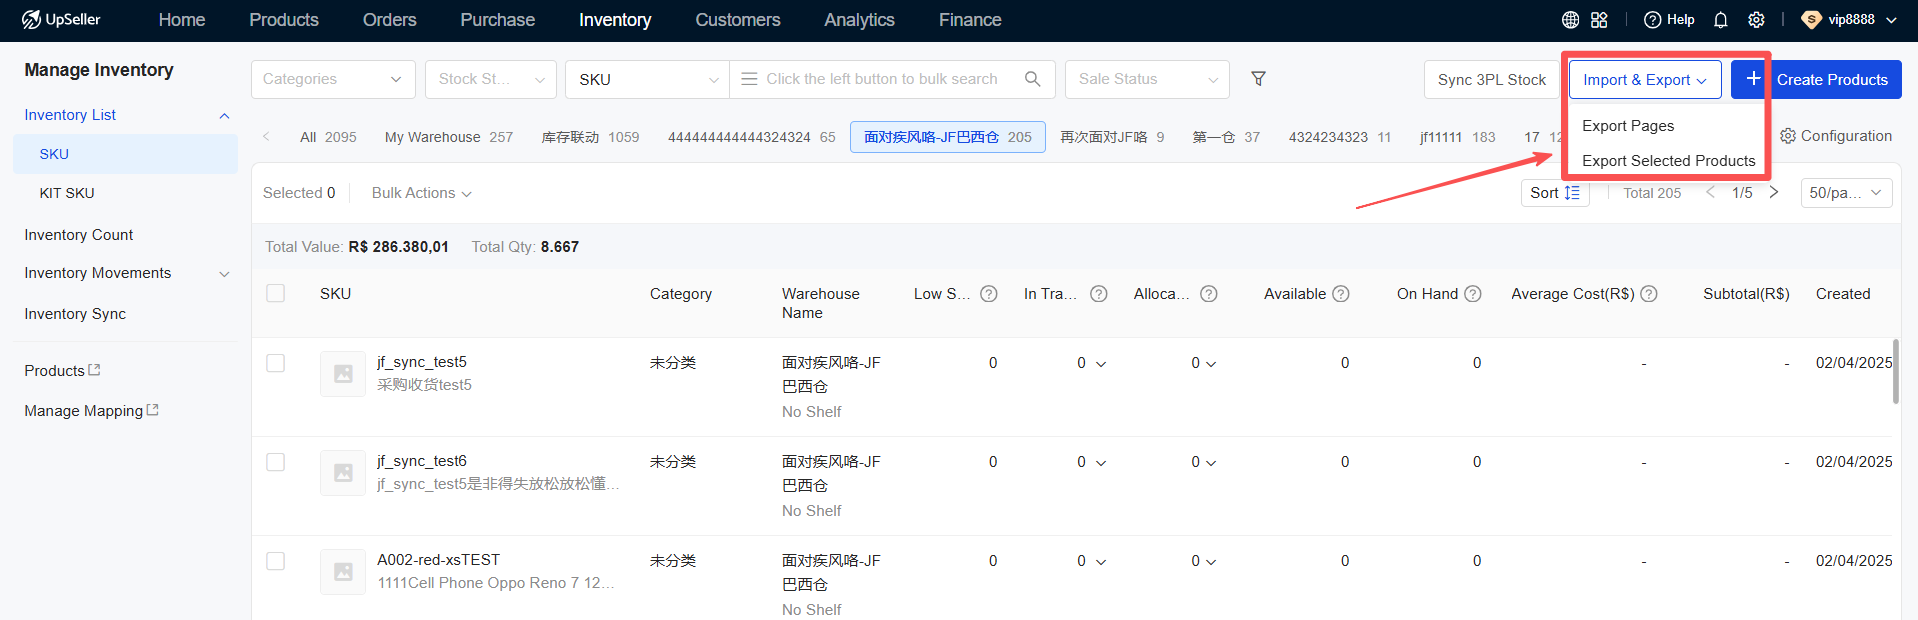
Export Products: The specific operational steps are shown in the figure below.
Step 8: Push Orders to Third-Party Warehouse

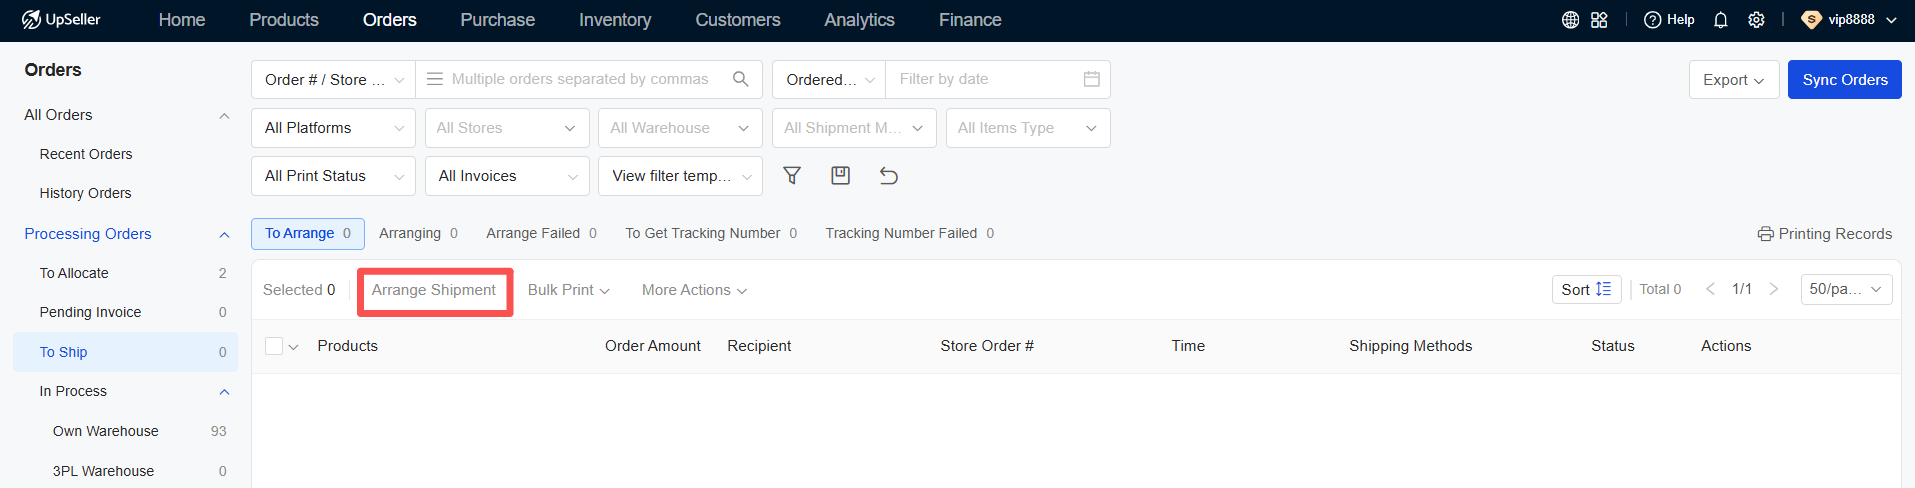
Step 1: In the Pending Shipment list, click Arrange Shipment.
Step 2: After scheduling the orders in UpSeller, they will be automatically pushed to the third-party warehouse. Await processing by the third-party warehouse, after which UpSeller will automatically sync the orders' latest status.
Note: Orders already pushed to the third-party warehouse support manual withdrawal. However, please note that orders already shipped by the third-party warehouse do not support withdrawal.
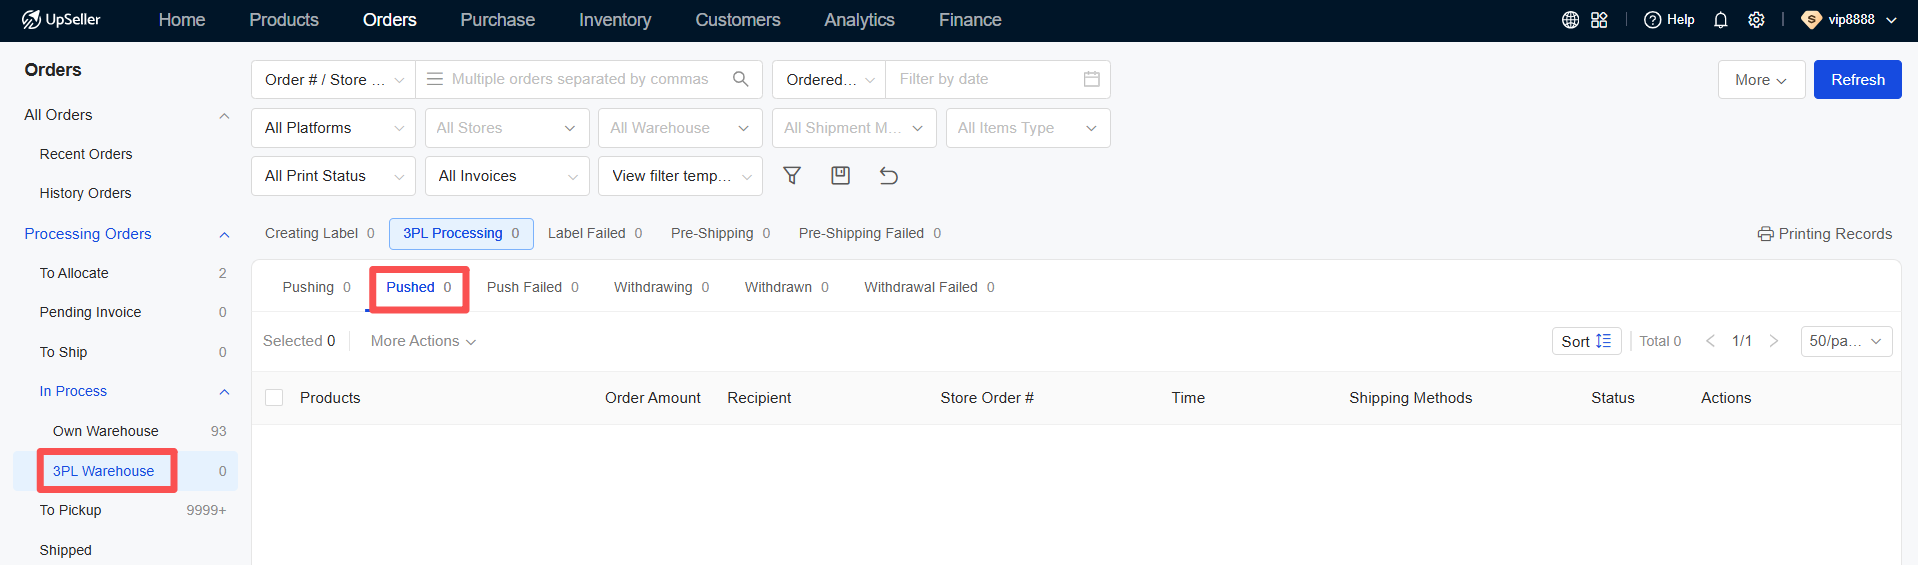
PS: If the warehouse requires product information to be displayed on the shipping label, please configure a custom shipping label in UpSeller.